Implementing an Azure Data Solution v1.0
Question 1
Note: This question is part of a series of questions that present the same scenario. Each question in the series contains a unique solution that might meet the stated goals. Some question sets might have more than one correct solution, while others might not have a correct solution.
After you answer a question in this section, you will NOT be able to return to it. As a result, these questions will not appear in the review screen.
You have an Azure Storage account that contains 100 GB of files. The files contain text and numerical values. 75% of the rows contain description data that has an average length of 1.1 MB.
You plan to copy the data from the storage account to an enterprise data warehouse in Azure Synapse Analytics.
You need to prepare the files to ensure that the data copies quickly.
Solution: You modify the files to ensure that each row is less than 1 MB.
Does this meet the goal?
- A. Yes
- B. No
Answer : B
Explanation:
Instead convert the files to compressed delimited text files.
Reference:
https://docs.microsoft.com/en-us/azure/sql-data-warehouse/guidance-for-loading-data
Question 2
Note: This question is part of a series of questions that present the same scenario. Each question in the series contains a unique solution that might meet the stated goals. Some question sets might have more than one correct solution, while others might not have a correct solution.
After you answer a question in this section, you will NOT be able to return to it. As a result, these questions will not appear in the review screen.
You have an Azure Storage account that contains 100 GB of files. The files contain text and numerical values. 75% of the rows contain description data that has an average length of 1.1 MB.
You plan to copy the data from the storage account to an Azure SQL data warehouse.
You need to prepare the files to ensure that the data copies quickly.
Solution: You modify the files to ensure that each row is more than 1 MB.
Does this meet the goal?
- A. Yes
- B. No
Answer : B
Explanation:
Instead modify the files to ensure that each row is less than 1 MB.
References:
https://docs.microsoft.com/en-us/azure/sql-data-warehouse/guidance-for-loading-data
Question 3
Note: This question is part of a series of questions that present the same scenario. Each question in the series contains a unique solution that might meet the stated goals. Some question sets might have more than one correct solution, while others might not have a correct solution.
After you answer a question in this section, you will NOT be able to return to it. As a result, these questions will not appear in the review screen.
You have an Azure Storage account that contains 100 GB of files. The files contain text and numerical values. 75% of the rows contain description data that has an average length of 1.1 MB.
You plan to copy the data from the storage account to an enterprise data warehouse in Azure Synapse Analytics.
You need to prepare the files to ensure that the data copies quickly.
Solution: You copy the files to a table that has a columnstore index.
Does this meet the goal?
- A. Yes
- B. No
Answer : B
Explanation:
Instead convert the files to compressed delimited text files.
Reference:
https://docs.microsoft.com/en-us/azure/sql-data-warehouse/guidance-for-loading-data
Question 4
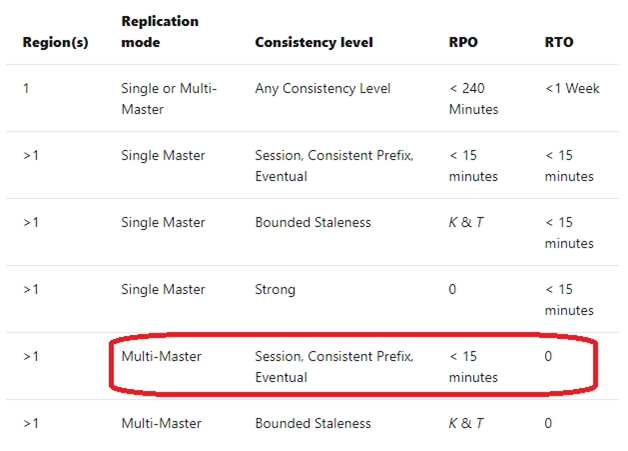
You plan to deploy an Azure Cosmos DB database that supports multi-master replication.
You need to select a consistency level for the database to meet the following requirements:
✑ Provide a recovery point objective (RPO) of less than 15 minutes.
✑ Provide a recovery time objective (RTO) of zero minutes.
What are three possible consistency levels that you can select? Each correct answer presents a complete solution.
NOTE: Each correct selection is worth one point.
- A. Strong
- B. Bounded Staleness
- C. Eventual
- D. Session
- E. Consistent Prefix
Answer : CDE
Explanation:
Reference:
https://docs.microsoft.com/en-us/azure/cosmos-db/consistency-levels-choosing
Question 5
SIMULATION -

Use the following login credentials as needed:
Azure Username: xxxxx -
Azure Password: xxxxx -
The following information is for technical support purposes only:
Lab Instance: 10277521 -
You need to ensure that you can recover any blob data from an Azure Storage account named storage 10277521 up to 30 days after the data is deleted.
To complete this task, sign in to the Azure portal.
Answer : See the explanation below.
Explanation:
1. Open Azure Portal and open the Azure Blob storage account named storage10277521.
2. Right-click and select Blob properties
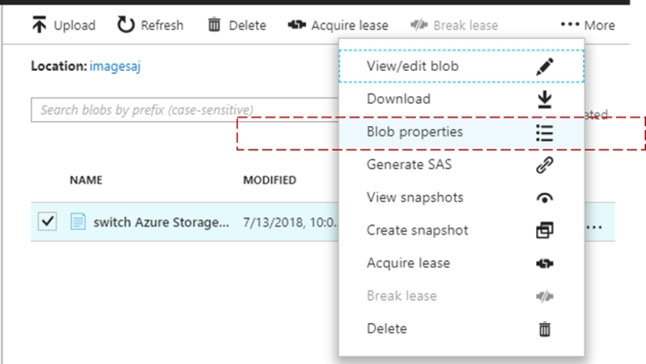
3. From the properties window, change the access tier for the blob to Cool.

Note: The cool access tier has lower storage costs and higher access costs compared to hot storage. This tier is intended for data that will remain in the cool tier for at least 30 days.
Reference:
https://dailydotnettips.com/how-to-update-access-tier-in-azure-storage-blob-level/
Question 6
SIMULATION -

Use the following login credentials as needed:
Azure Username: xxxxx -
Azure Password: xxxxx -
The following information is for technical support purposes only:
Lab Instance: 10277521 -
You need to replicate db1 to a new Azure SQL server named REPL10277521 in the Central Canada region.
To complete this task, sign in to the Azure portal.
NOTE: This task might take several minutes to complete. You can perform other tasks while the task completes or ends this section of the exam.
To complete this task, sign in to the Azure portal.
Answer : See the explanation below.
Explanation:
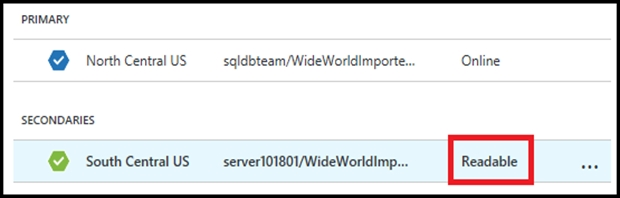
1. In the Azure portal, browse to the database that you want to set up for geo-replication.
2. On the SQL database page, select geo-replication, and then select the region to create the secondary database.
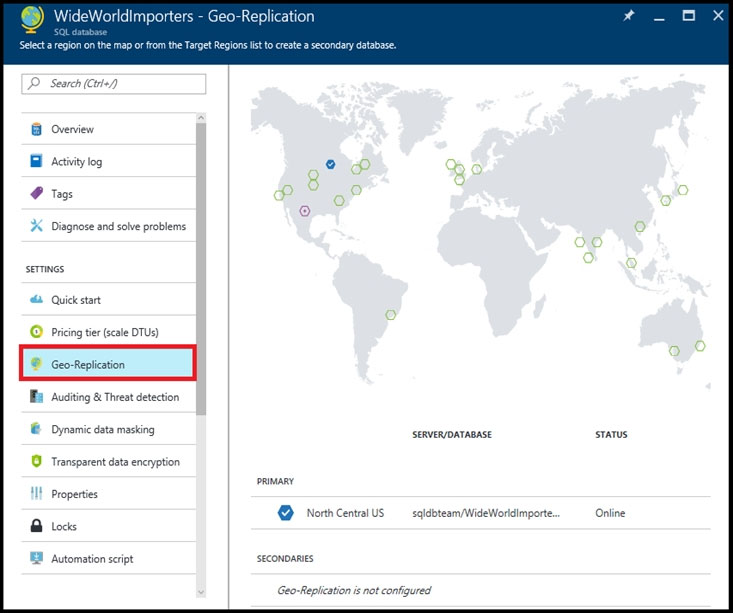
3. Select or configure the server and for the secondary database.
Region: Central Canada -
Target server: REPL10277521 -
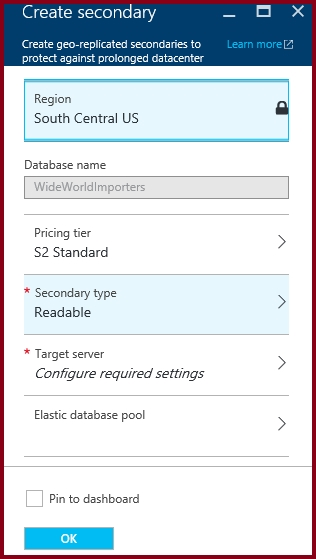
4. Click Create to add the secondary.
5. The secondary database is created and the seeding process begins.
6. When the seeding process is complete, the secondary database displays its status.
References:
https://docs.microsoft.com/en-us/azure/sql-database/sql-database-active-geo-replication-portal
Question 7
SIMULATION -

Use the following login credentials as needed:
Azure Username: xxxxx -
Azure Password: xxxxx -
The following information is for technical support purposes only:
Lab Instance: 10277521 -
You need to create an Azure SQL database named db3 on an Azure SQL server named SQL10277521. Db3 must use the Sample (AdventureWorksLT) source.
To complete this task, sign in to the Azure portal.
Answer : See the explanation below.
Explanation:
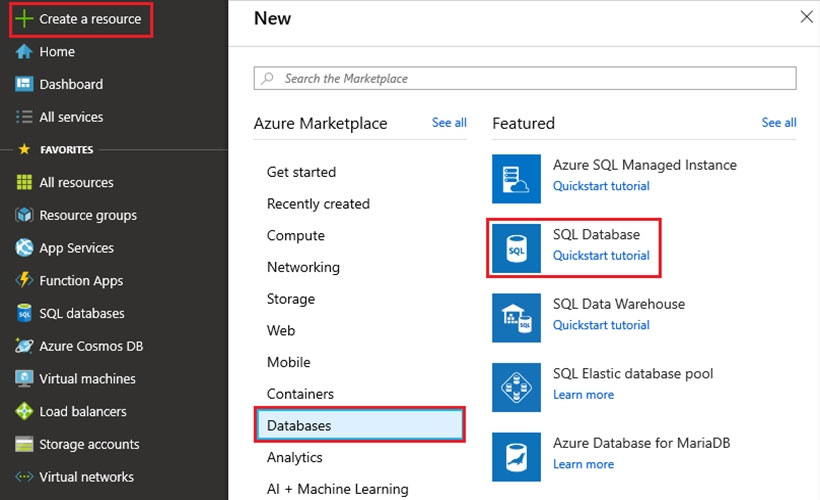
1. Click Create a resource in the upper left-hand corner of the Azure portal.
2. On the New page, select Databases in the Azure Marketplace section, and then click SQL Database in the Featured section.
3. Fill out the SQL Database form with the following information, as shown below:
Database name: Db3 -
Select source: Sample (AdventureWorksLT)
Server: SQL10277521 -
4. Click Select and finish the Wizard using default options.
References:
https://docs.microsoft.com/en-us/azure/sql-database/sql-database-design-first-database
Question 8
SIMULATION -

Use the following login credentials as needed:
Azure Username: xxxxx -
Azure Password: xxxxx -
The following information is for technical support purposes only:
Lab Instance: 10277521 -
You plan to query db3 to retrieve a list of sales customers. The query will retrieve several columns that include the email address of each sales customer.
You need to modify db3 to ensure that a portion of the email addresses is hidden in the query results.
To complete this task, sign in to the Azure portal.
Answer : See the explanation below.
Explanation:
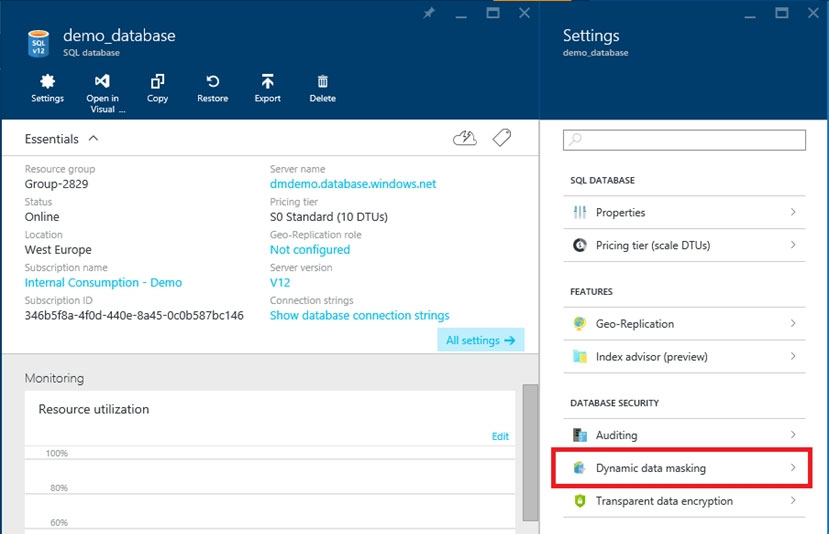
1. Launch the Azure portal.
2. Navigate to the settings page of the database db3 that includes the sensitive data you want to mask.
3. Click the Dynamic Data Masking tile that launches the Dynamic Data Masking configuration page.
Note: Alternatively, you can scroll down to the Operations section and click Dynamic Data Masking.
4. In the Dynamic Data Masking configuration page, you may see some database columns that the recommendations engine has flagged for masking.
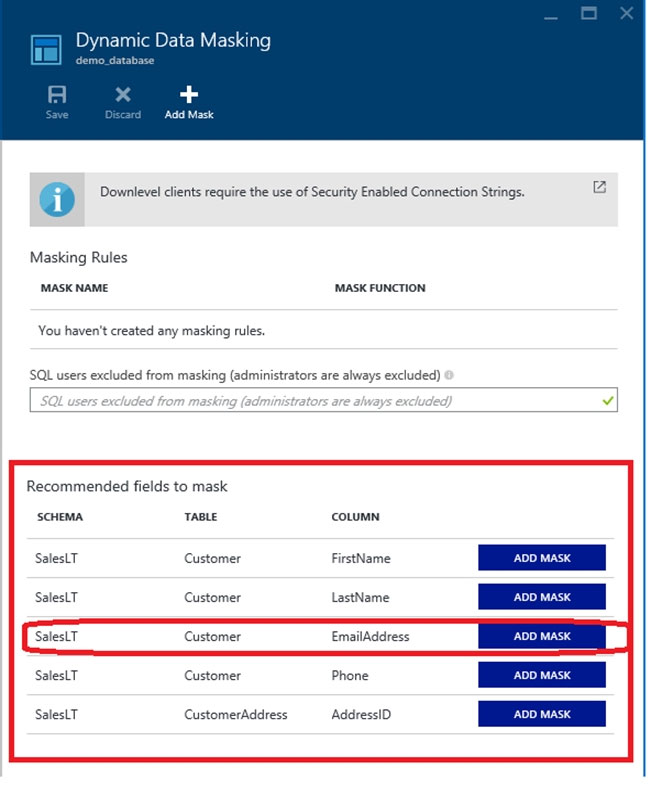
5. Click ADD MASK for the EmailAddress column
6. Click Save in the data masking rule page to update the set of masking rules in the dynamic data masking policy.
References:
https://docs.microsoft.com/en-us/azure/sql-database/sql-database-dynamic-data-masking-get-started-portal
Question 9
SIMULATION -

Use the following login credentials as needed:
Azure Username: xxxxx -
Azure Password: xxxxx -
The following information is for technical support purposes only:
Lab Instance: 10277521 -
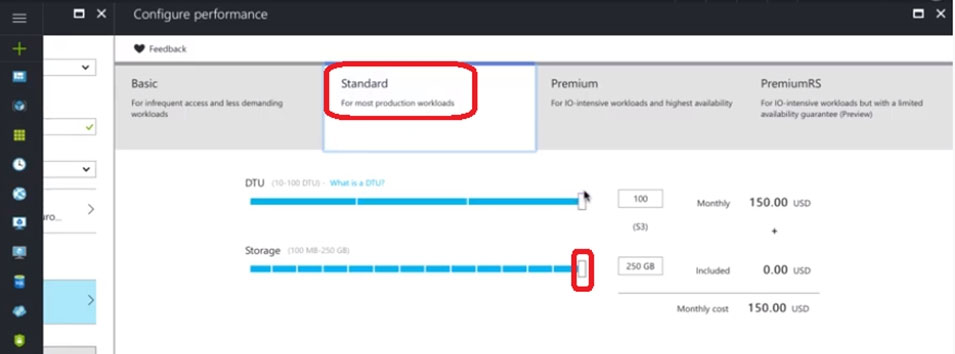
You need to increase the size of db2 to store up to 250 GB of data.
To complete this task, sign in to the Azure portal.
Answer : See the explanation below.
Explanation:
1. In Azure Portal, navigate to the SQL databases page, select the db2 database , and choose Configure performance
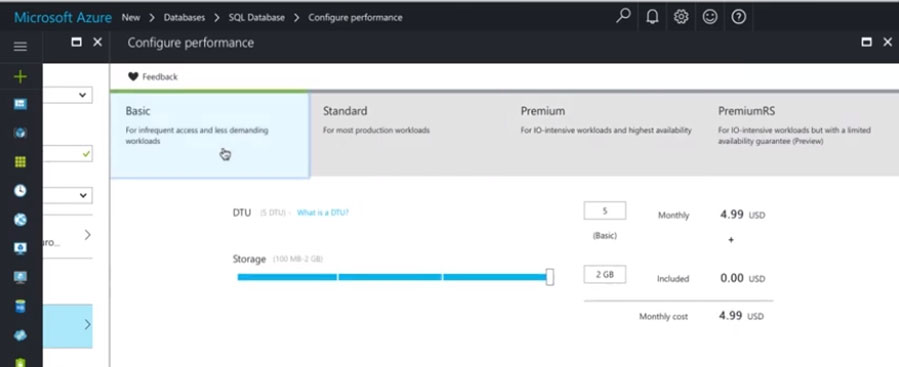
2. Click on Standard and Adjust the Storage size to 250 GB
References:
https://docs.microsoft.com/en-us/azure/sql-database/sql-database-single-databases-manage
Question 10
HOTSPOT -
You have an enterprise data warehouse in Azure Synapse Analytics that contains a table named FactOnlineSales. The table contains data from the start of 2009 to the end of 2012.
You need to improve the performance of queries against FactOnlineSales by using table partitions. The solution must meet the following requirements:
✑ Create four partitions based on the order date.
✑ Ensure that each partition contains all the orders placed during a given calendar year.
How should you complete the T-SQL command? To answer, select the appropriate options in the answer area.
NOTE: Each correct selection is worth one point.
Hot Area:
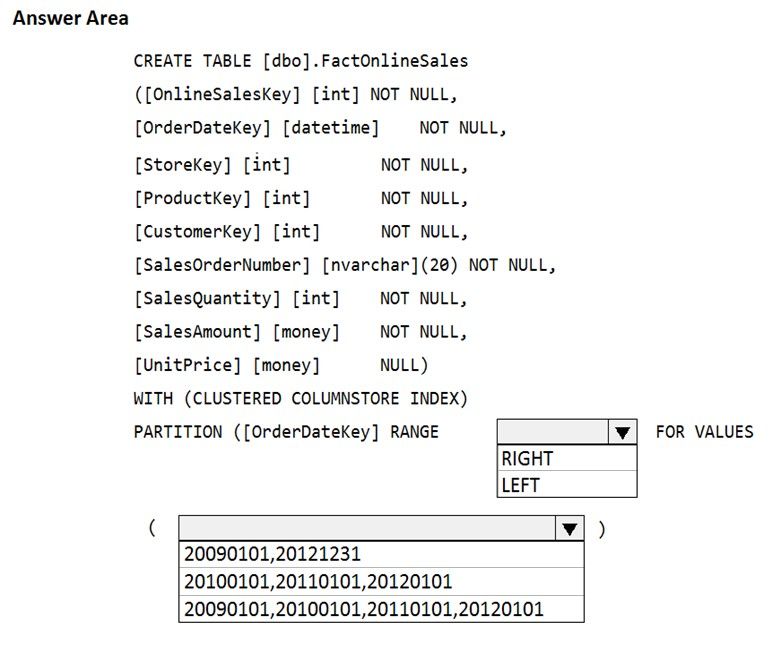
Answer : 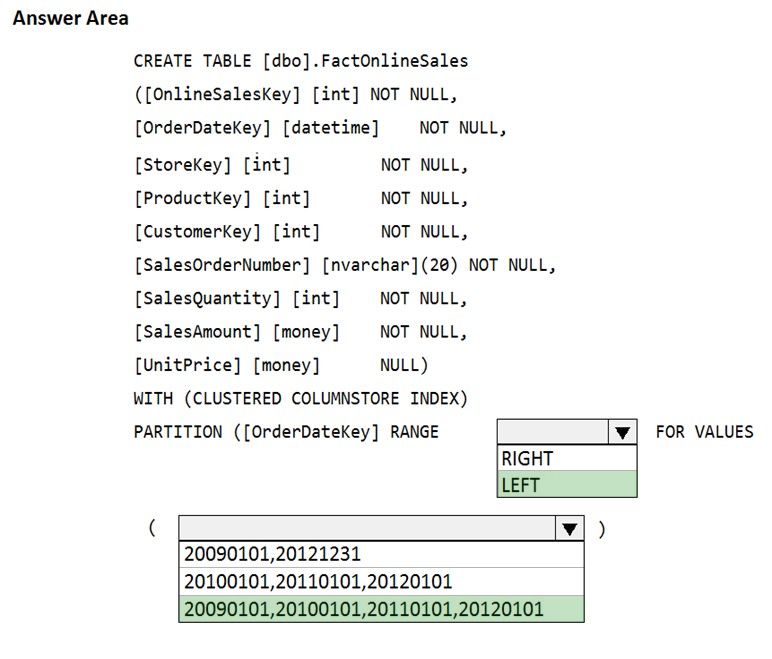
Explanation:
Box 1: LEFT -
RANGE LEFT: Specifies the boundary value belongs to the partition on the left (lower values). The default is LEFT.
Box 2: 20090101, 20100101, 20110101, 20120101
FOR VALUES ( boundary_value [,...n] ) specifies the boundary values for the partition. boundary_value is a constant expression.
Reference:
https://docs.microsoft.com/en-us/sql/t-sql/statements/create-table-azure-sql-data-warehouse
Question 11
SIMULATION -
Use the following login credentials as needed:
Azure Username: xxxxx -
Azure Password: xxxxx -
The following information is for technical support purposes only:
Lab Instance: 10543936 -

You need to create an elastic pool that contains an Azure SQL database named db2 and a new SQL database named db3.
To complete this task, sign in to the Azure portal.
Answer : See the explanation below.
Explanation:
Step 1: Create a new SQL database named db3
1. Select SQL in the left-hand menu of the Azure portal. If SQL is not in the list, select All services, then type SQL in the search box.
2. Select + Add to open the Select SQL deployment option page. Select Single Database. You can view additional information about the different databases by selecting Show details on the Databases tile.
3. Select Create:
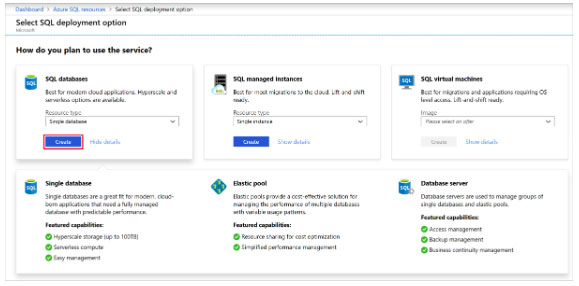

4. Enter the required fields if necessary.
5. Leave the rest of the values as default and select Review + Create at the bottom of the form.
6. Review the final settings and select Create. Use Db3 as database name.
On the SQL Database form, select Create to deploy and provision the resource group, server, and database.
Step 2: Create your elastic pool using the Azure portal.
1. Select Azure SQL in the left-hand menu of the Azure portal. If Azure SQL is not in the list, select All services, then type Azure SQL in the search box.
2. Select + Add to open the Select SQL deployment option page.
3. Select Elastic pool from the Resource type drop-down in the SQL Databases tile. Select Create to create your elastic pool.

4. Configure your elastic pool with the following values:
Name: Provide a unique name for your elastic pool, such as myElasticPool.
Subscription: Select your subscription from the drop-down.
ResourceGroup: Select the resource group.
Server: Select the server -

5. Select Configure elastic pool
6. On the Configure page, select the Databases tab, and then choose to Add database.
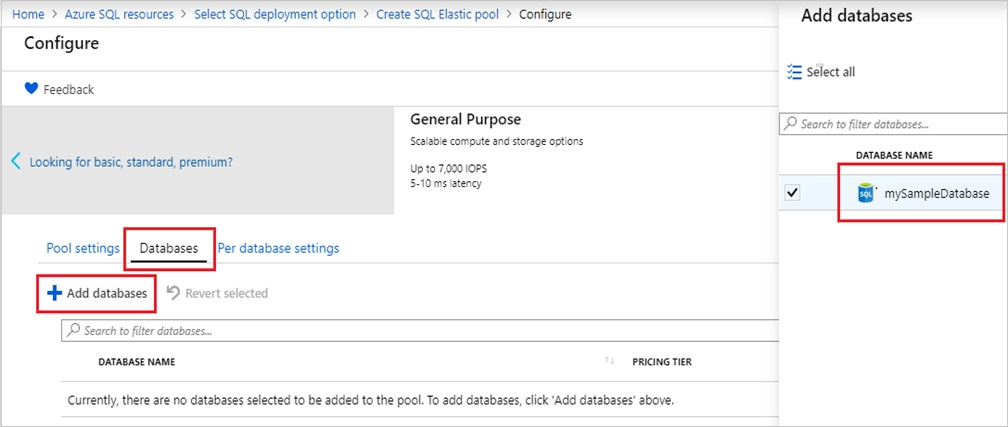
7. Add the Azure SQL database named db2, and the new SQL database named db3 that you created in Step 1.
8. Select Review + create to review your elastic pool settings and then select Create to create your elastic pool.
Reference:
https://docs.microsoft.com/bs-latn-ba/azure/sql-database/sql-database-elastic-pool-failover-group-tutorial
Question 12
SIMULATION -
Use the following login credentials as needed:
Azure Username: xxxxx -
Azure Password: xxxxx -
The following information is for technical support purposes only:
Lab Instance: 10543936 -

You need to create an Azure Storage account named account10543936. The solution must meet the following requirements:
✑ Minimize storage costs.
✑ Ensure that account10543936 can store many image files.
Ensure that account10543936 can quickly retrieve stored image files.

To complete this task, sign in to the Azure portal.
Answer : See the explanation below.
Explanation:
Create a general-purpose v2 storage account, which provides access to all of the Azure Storage services: blobs, files, queues, tables, and disks.
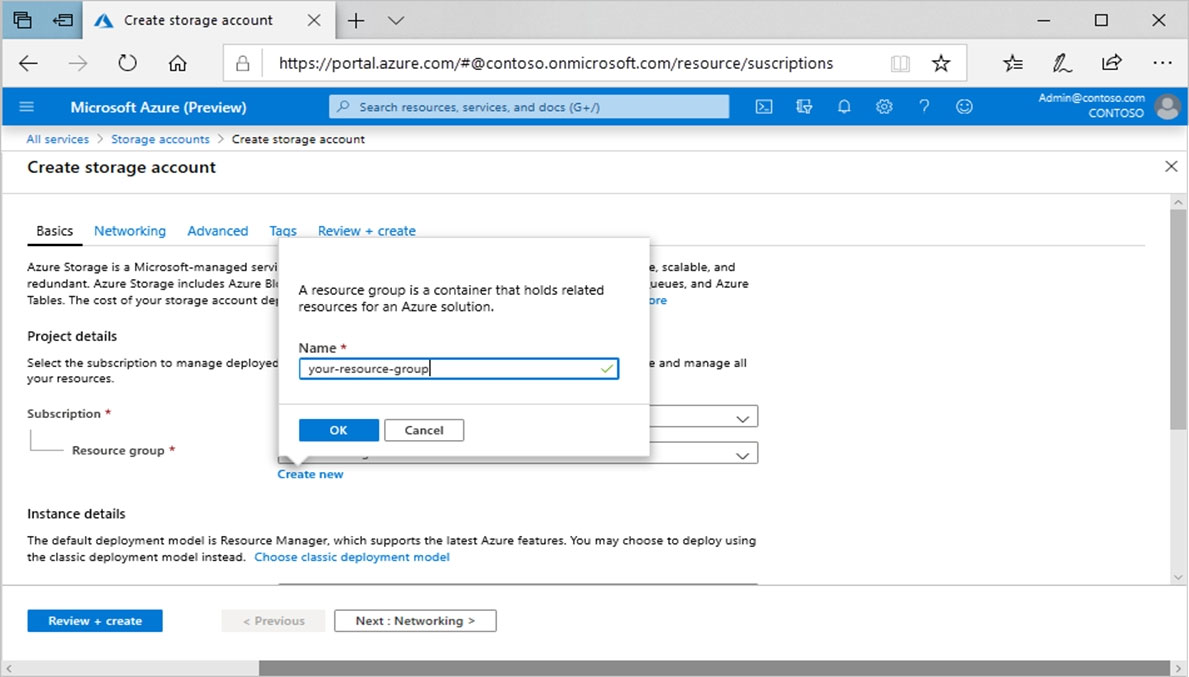
1. On the Azure portal menu, select All services. In the list of resources, type Storage Accounts. As you begin typing, the list filters based on your input. Select
Storage Accounts.
2. On the Storage Accounts window that appears, choose Add.
3. Select the subscription in which to create the storage account.
4. Under the Resource group field, select Create new. Enter the name for your new resource group, as shown in the following image.
5. Next, enter the name account10543936 for your storage account.
6. Select a location for your storage account, or use the default location.
7. Leave these fields set to their default values:
Deployment model: Resource Manager
Performance: Standard -
Account kind: StorageV2 (general-purpose v2)
Replication: Read-access geo-redundant storage (RA-GRS)
Access tier: Hot -
8. Select Review + Create to review your storage account settings and create the account.
9. Select Create.
Reference:
https://docs.microsoft.com/en-us/azure/storage/common/storage-account-create
Question 13
SIMULATION -
Use the following login credentials as needed:
Azure Username: xxxxx -
Azure Password: xxxxx -
The following information is for technical support purposes only:
Lab Instance: 10543936 -
You need to ensure that users in the West US region can read data from a local copy of an Azure Cosmos DB database named cosmos10543936.
To complete this task, sign in to the Azure portal.
NOTE: This task might take several minutes to complete. You can perform other tasks while the task completes or end this section of the exam.
Answer : See the explanation below.
Explanation:
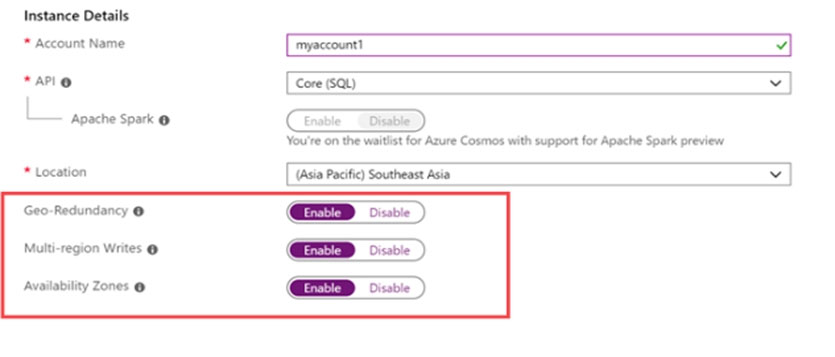
You can enable Availability Zones by using Azure portal when creating an Azure Cosmos account.
You can enable Availability Zones by using Azure portal.
Step 1: enable the Geo-redundancy, Multi-region Writes
1. In Azure Portal search for and select Azure Cosmos DB.
2. Locate the Cosmos DB database named cosmos10543936
3. Access the properties for cosmos10543936
4. enable the Geo-redundancy, Multi-region Writes.
Location: West US region -
Step 2: Add region from your database account
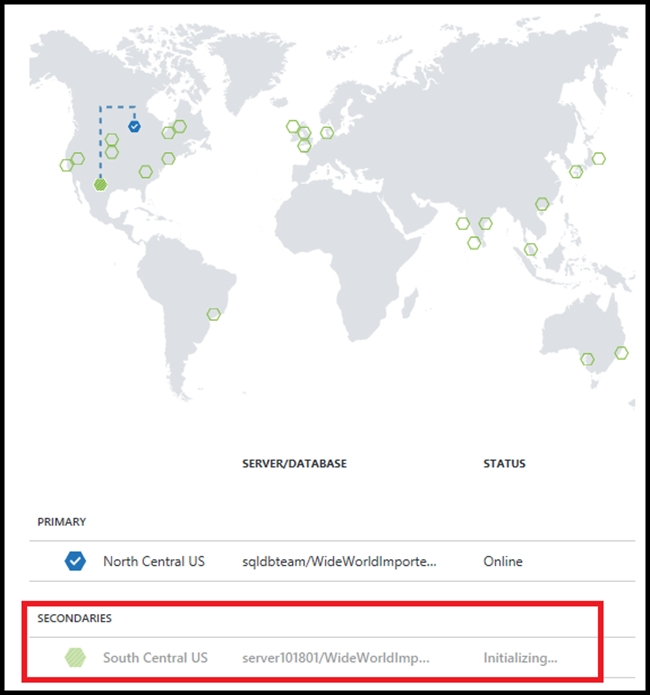
1. In to Azure portal, go to your Azure Cosmos account, and open the Replicate data globally menu.
2. To add regions, select the hexagons on the map with the + label that corresponds to your desired region(s). Alternatively, to add a region, select the + Add region option and choose a region from the drop-down menu.
Add: West US region -
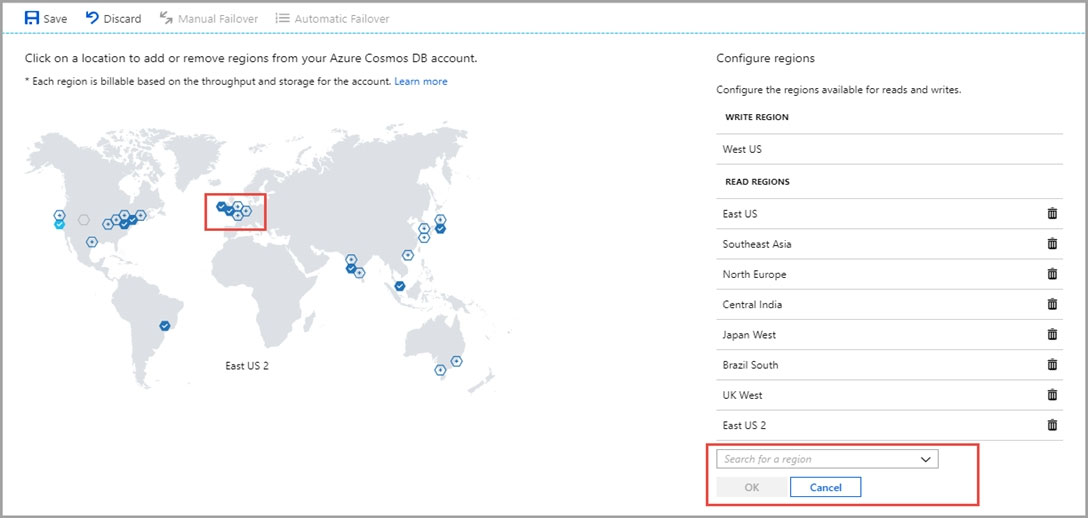
3. To save your changes, select OK.
Reference:
https://docs.microsoft.com/en-us/azure/cosmos-db/high-availability https://docs.microsoft.com/en-us/azure/cosmos-db/how-to-manage-database-account
Question 14
SIMULATION -
Use the following login credentials as needed:
Azure Username: xxxxx -
Azure Password: xxxxx -
The following information is for technical support purposes only:
Lab Instance: 10543936 -

You plan to enable Azure Multi-Factor Authentication (MFA).
You need to ensure that [email protected] can manage any databases hosted on an Azure SQL server named SQL10543936 by signing in using his Azure Active Directory (Azure AD) user account.
To complete this task, sign in to the Azure portal.
Answer : See the explanation below.
Explanation:
Provision an Azure Active Directory administrator for your managed instance
Each Azure SQL server (which hosts a SQL Database or SQL Data Warehouse) starts with a single server administrator account that is the administrator of the entire Azure SQL server. A second SQL Server administrator must be created, that is an Azure AD account. This principal is created as a contained database user in the master database.
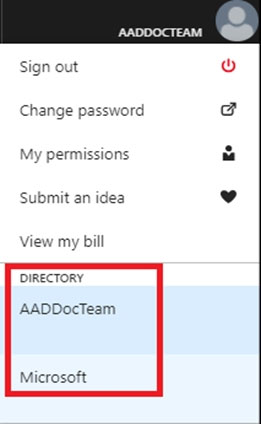
1. In the Azure portal, in the upper-right corner, select your connection to drop down a list of possible Active Directories. Choose the correct Active Directory as the default Azure AD. This step links the subscription-associated Active Directory with Azure SQL server making sure that the same subscription is used for both
Azure AD and SQL Server. (The Azure SQL server can be hosting either Azure SQL Database or Azure SQL Data Warehouse.)
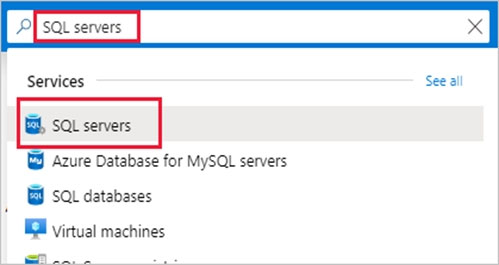
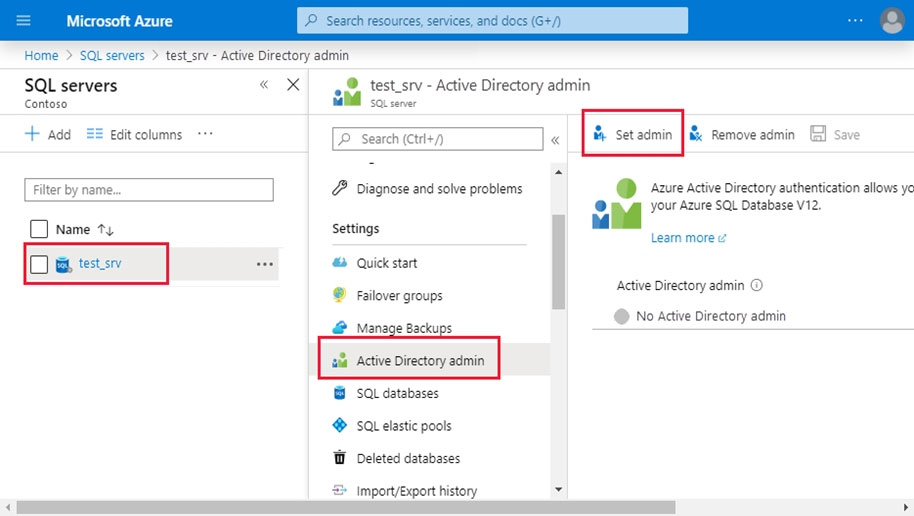
2. Search for and select the SQL server SQL10543936
3. In SQL Server page, select Active Directory admin.
4. In the Active Directory admin page, select Set admin.
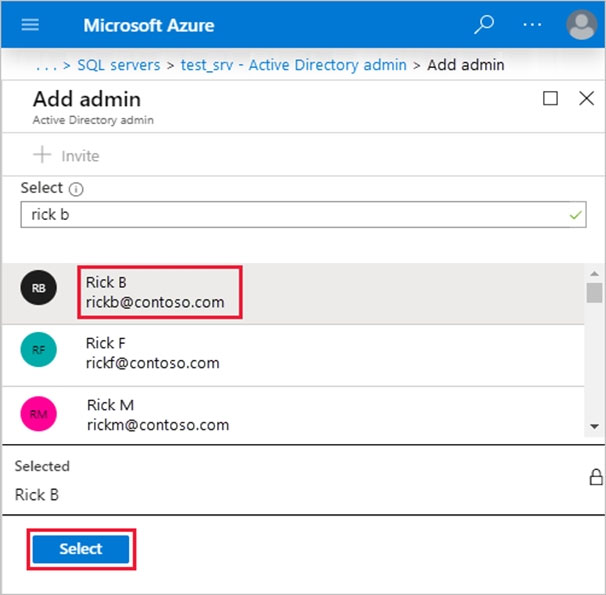
5. In the Add admin page, search for user [email protected], select it, and then select Select. (The Active Directory admin page shows all members and groups of your Active Directory. Users or groups that are grayed out cannot be selected because they are not supported as Azure AD administrators.
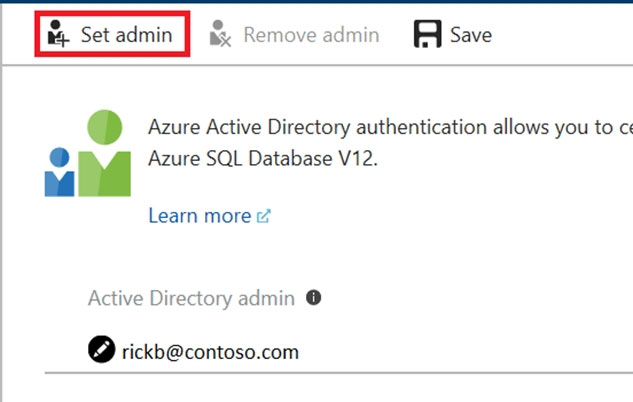
6. At the top of the Active Directory admin page, select SAVE.
Reference:
https://docs.microsoft.com/en-us/azure/sql-database/sql-database-aad-authentication-configure?
Question 15
HOTSPOT -
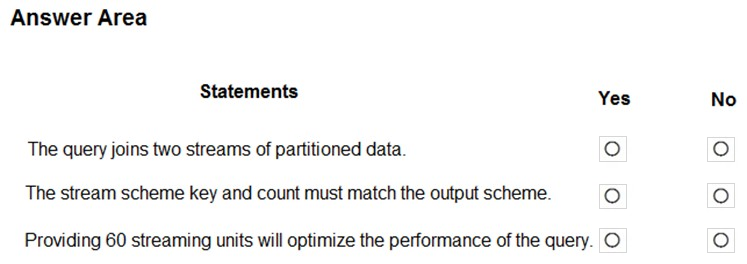
You have the following Azure Stream Analytics query.
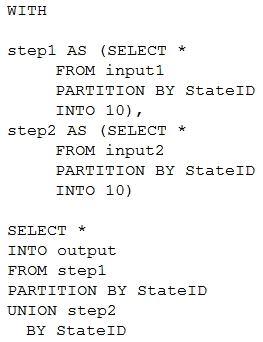
For each of the following statements, select Yes if the statement is true. Otherwise, select No.
NOTE: Each correct selection is worth one point.
Hot Area:
Answer : 
Explanation:
Box 1: No -
Note: You can now use a new extension of Azure Stream Analytics SQL to specify the number of partitions of a stream when reshuffling the data.
The outcome is a stream that has the same partition scheme. Please see below for an example:
WITH step1 AS (SELECT * FROM [input1] PARTITION BY DeviceID INTO 10), step2 AS (SELECT * FROM [input2] PARTITION BY DeviceID INTO 10)
SELECT * INTO [output] FROM step1 PARTITION BY DeviceID UNION step2 PARTITION BY DeviceID
Note: The new extension of Azure Stream Analytics SQL includes a keyword INTO that allows you to specify the number of partitions for a stream when performing reshuffling using a PARTITION BY statement.
Box 2: Yes -
When joining two streams of data explicitly repartitioned, these streams must have the same partition key and partition count.
Box 3: Yes -
Streaming Units (SUs) represents the computing resources that are allocated to execute a Stream Analytics job. The higher the number of SUs, the more CPU and memory resources are allocated for your job.
In general, the best practice is to start with 6 SUs for queries that don't use PARTITION BY.
Here there are 10 partitions, so 6x10 = 60 SUs is good.
Note: Remember, Streaming Unit (SU) count, which is the unit of scale for Azure Stream Analytics, must be adjusted so the number of physical resources available to the job can fit the partitioned flow. In general, six SUs is a good number to assign to each partition. In case there are insufficient resources assigned to the job, the system will only apply the repartition if it benefits the job.
Reference:
https://azure.microsoft.com/en-in/blog/maximize-throughput-with-repartitioning-in-azure-stream-analytics/ https://docs.microsoft.com/en-us/azure/stream-analytics/stream-analytics-streaming-unit-consumption