Microsoft Azure Architect Technologies v1.0
Question 1
HOTSPOT -
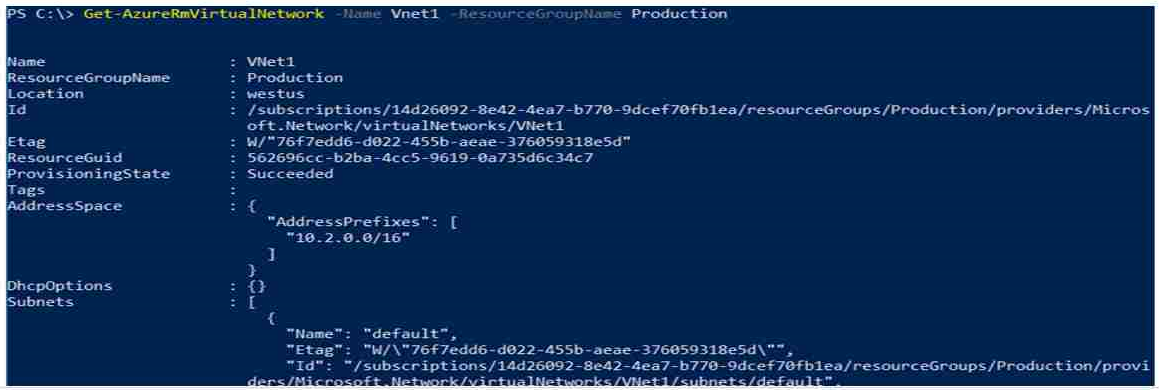
You have a virtual network named VNet1 that has the configuration shown in the following exhibit.
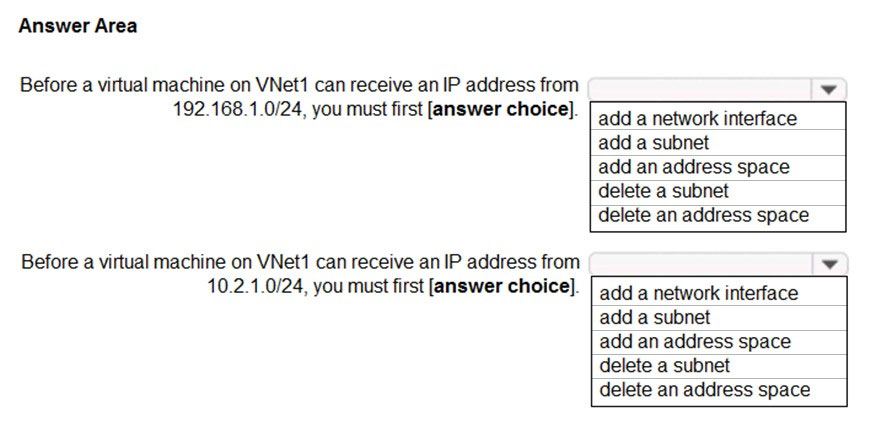
Use the drop-down menus to select the answer choice that completes each statement based on the information presented in the graphic.
NOTE: Each correct selection is worth one point.
Hot Area:
Answer : 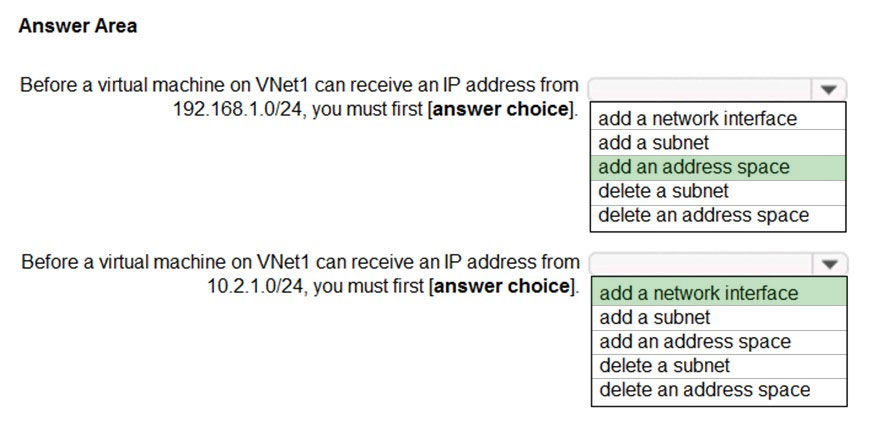
Explanation:
Box 1: add an address space -
Your IaaS virtual machines (VMs) and PaaS role instances in a virtual network automatically receive a private IP address from a range that you specify, based on the address space of the subnet they are connected to. We need to add the 192.168.1.0/24 address space.
Box 2: add a network interface -
The 10.2.1.0/24 network exists. We need to add a network interface.
References:
https://docs.microsoft.com/en-us/office365/enterprise/designing-networking-for-microsoft-azure-iaas https://docs.microsoft.com/en-us/azure/virtual-network/virtual-networks-static-private-ip-arm-pportal
Question 2
HOTSPOT -
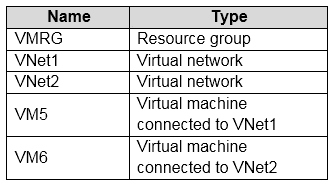
You have an Azure subscription named Subscription1. Subscription1 contains the resources in the following table.
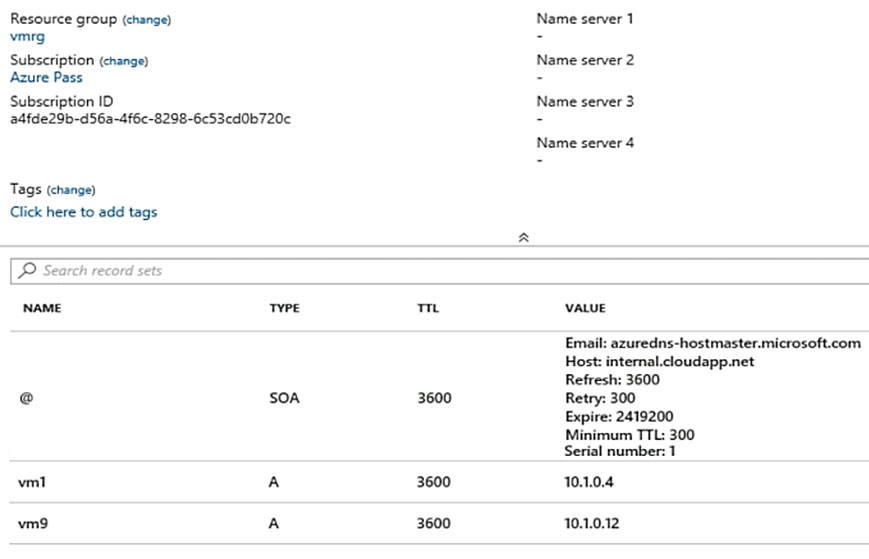
In Azure, you create a private DNS zone named adatum.com. You set the registration virtual network to VNet2. The adatum.com zone is configured is shown in the following exhibit.
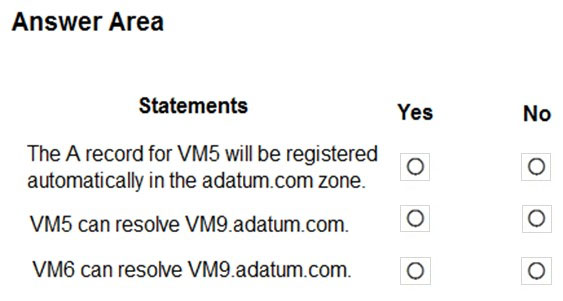
For each of the following statements, select Yes if the statement is true. Otherwise, select No.
NOTE: Each correct selection is worth one point.
Hot Area:
Answer : 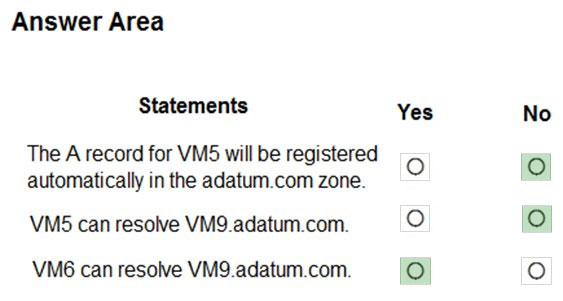
Explanation:
Box 1: No -
Azure DNS provides automatic registration of virtual machines from a single virtual network that's linked to a private zone as a registration virtual network. VM5 does not belong to the registration virtual network though.
Box 2: No -
Forward DNS resolution is supported across virtual networks that are linked to the private zone as resolution virtual networks. VM5 does belong to a resolution virtual network.
Box 3: Yes -
VM6 belongs to registration virtual network, and an A (Host) record exists for VM9 in the DNS zone.
By default, registration virtual networks also act as resolution virtual networks, in the sense that DNS resolution against the zone works from any of the virtual machines within the registration virtual network.
References:
https://docs.microsoft.com/en-us/azure/dns/private-dns-overview
Question 3
You have a virtual network named VNet1 as shown in the exhibit. (Click the Exhibit tab.)
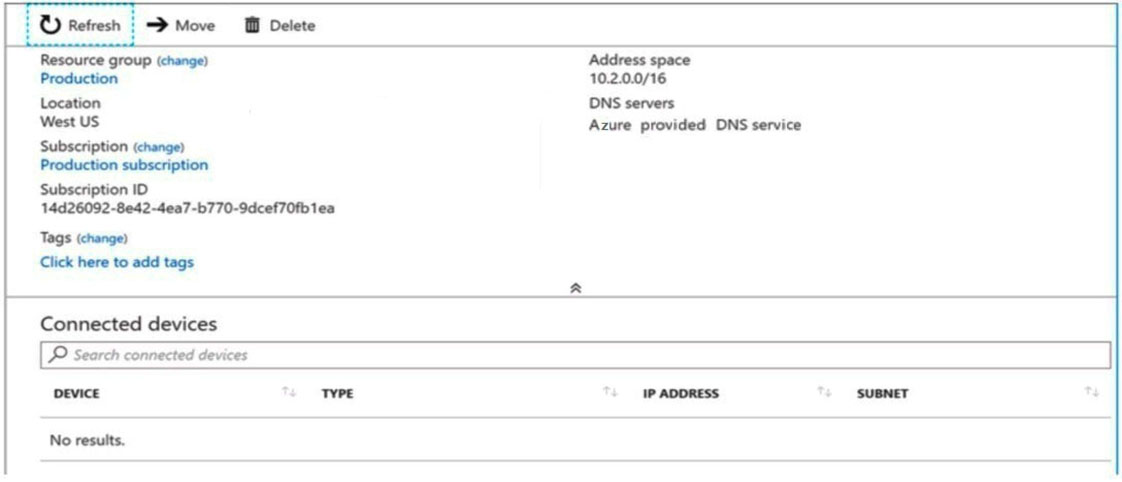
No devices are connected to VNet1.
You plan to peer VNet1 to another virtual network named VNet2 in the same region. VNet2 has an address space of 10.2.0.0/16.
You need to create the peering.
What should you do first?
- A. Add a gateway subnet to VNet1.
- B. Create a subnet on VNet1 and VNet2
- C. Modify the address space of VNet1
- D. Configure a service endpoint on VNet2
Answer : C
Explanation:
The virtual networks you peer must have non-overlapping IP address spaces. The exhibit indicates that VNet1 has an address space of 10.2.0.0/16, which is the same as VNet2, and thus overlaps. We need to change the address space for VNet1.
References:
https://docs.microsoft.com/en-us/azure/virtual-network/virtual-network-manage-peering#requirements-and-constraints
Question 4
SIMULATION -
Click to expand each objective. To connect to the Azure portal, type https://portal.azure.com in the browser address bar.


When you are finished performing all the tasks, click the "˜Next"™ button.
Note that you cannot return to the lab once you click the "˜Next"™ button. Scoring occur in the background while you complete the rest of the exam.
Overview -
The following section of the exam is a lab. In this section, you will perform a set of tasks in a live environment. While most functionality will be available to you as it would be in a live environment, some functionality (e.g., copy and paste, ability to navigate to external websites) will not be possible by design.
Scoring is based on the outcome of performing the tasks stated in the lab. In other words, it doesn"™t matter how you accomplish the task, if you successfully perform it, you will earn credit for that task.
Labs are not timed separately, and this exam may have more than one lab that you must complete. You can use as much time as you would like to complete each lab. But, you should manage your time appropriately to ensure that you are able to complete the lab(s) and all other sections of the exam in the time provided.
Please note that once you submit your work by clicking the Next button within a lab, you will NOT be able to return to the lab.
To start the lab -
You may start the lab by clicking the Next button.
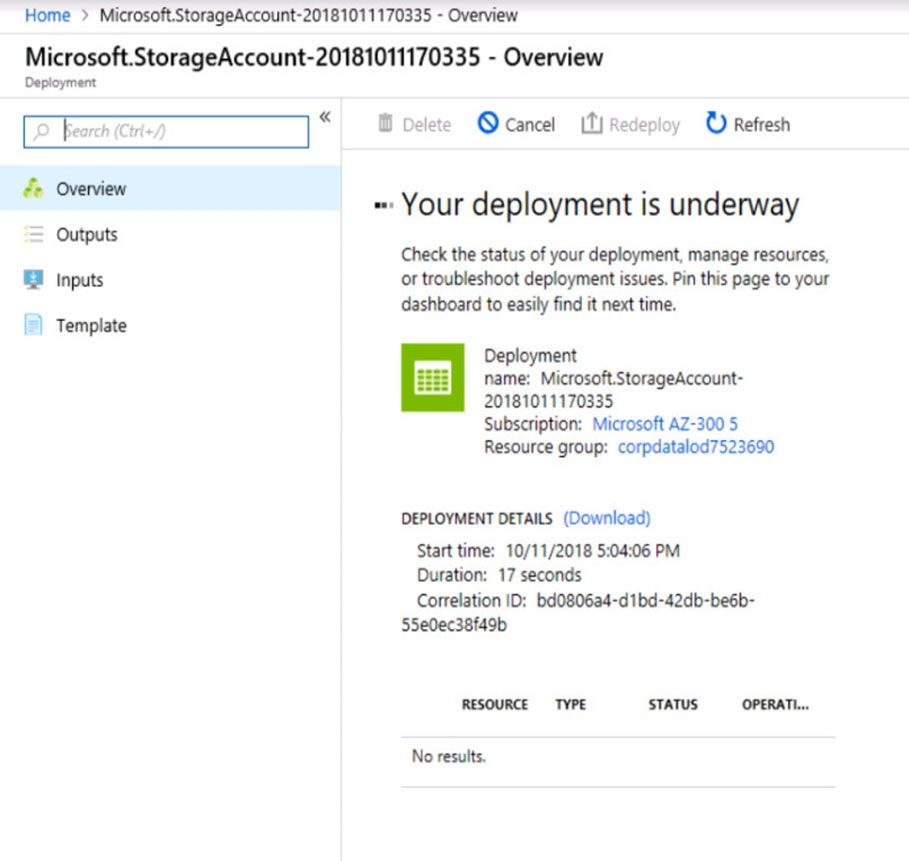
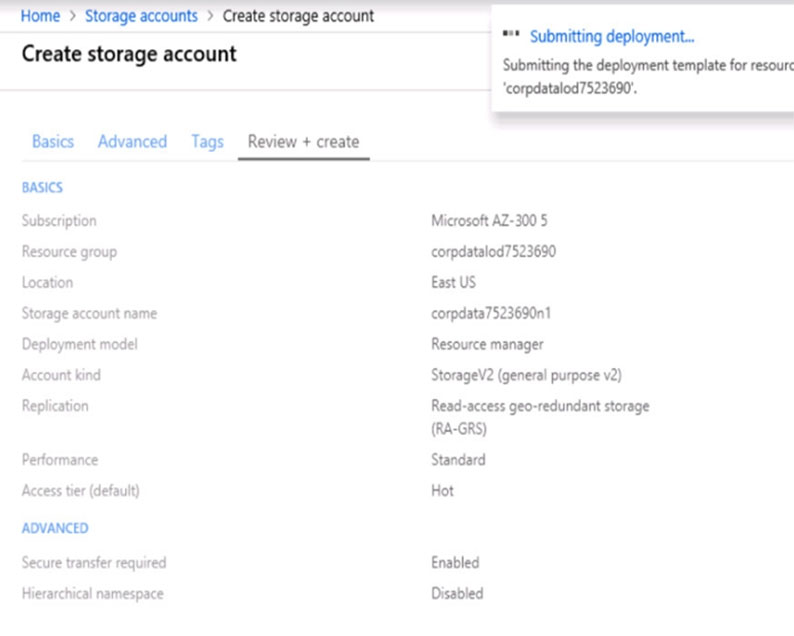
Your company plans to store several documents on a public website.
You need to create a container named bios that will host the documents in the corpdata7523690n1 storage account. The solution must ensure anonymous access and must ensure that users can browse folders in the container.
What should you do from the Azure portal?
Answer : See explanation below.
Explanation:
Azure portal create public container
To create a container in the Azure portal, follow these steps:
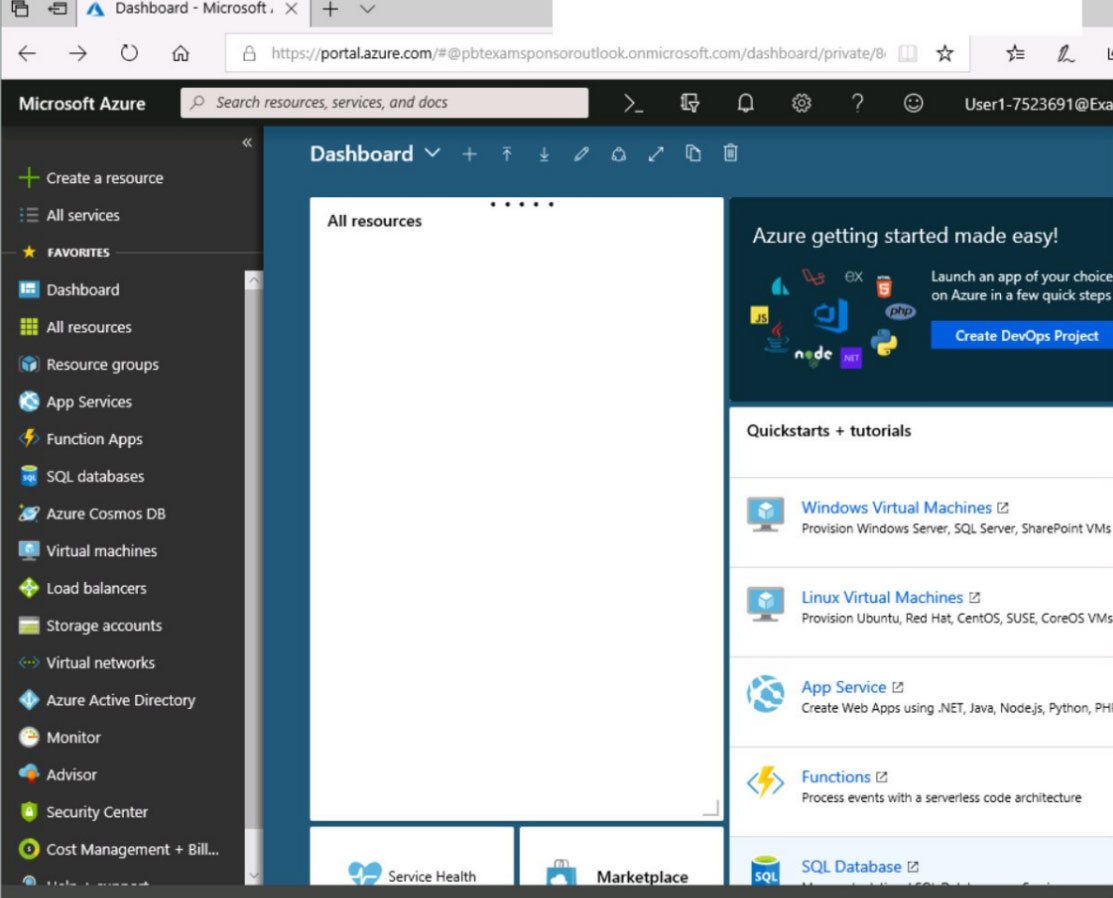
Step 1: Navigate to your new storage account in the Azure portal.
Step 2: In the left menu for the storage account, scroll to the lob service section, then select Blobs.
Select the + Container button.
Type a name for your new container: bios
Set the level of public access to the container: Select anonymous access.
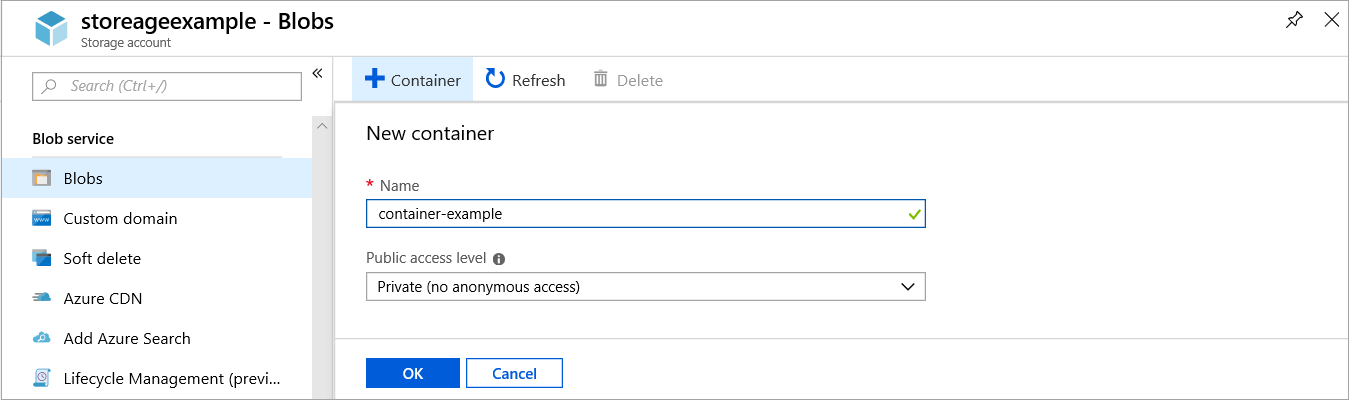
Step 3: Select OK to create the container.
References:
https://docs.microsoft.com/en-us/azure/storage/blobs/storage-quickstart-blobs-portal
Question 5
SIMULATION -
Click to expand each objective. To connect to the Azure portal, type https://portal.azure.com in the browser address bar.


When you are finished performing all the tasks, click the "˜Next"™ button.
Note that you cannot return to the lab once you click the "˜Next"™ button. Scoring occur in the background while you complete the rest of the exam.
Overview -
The following section of the exam is a lab. In this section, you will perform a set of tasks in a live environment. While most functionality will be available to you as it would be in a live environment, some functionality (e.g., copy and paste, ability to navigate to external websites) will not be possible by design.
Scoring is based on the outcome of performing the tasks stated in the lab. In other words, it doesn"™t matter how you accomplish the task, if you successfully perform it, you will earn credit for that task.
Labs are not timed separately, and this exam may have more than one lab that you must complete. You can use as much time as you would like to complete each lab. But, you should manage your time appropriately to ensure that you are able to complete the lab(s) and all other sections of the exam in the time provided.
Please note that once you submit your work by clicking the Next button within a lab, you will NOT be able to return to the lab.
To start the lab -
You may start the lab by clicking the Next button.
Your company plans to host in Azure the source files of several line-of-business applications.
You need to create an Azure file share named corpsoftware in the corpdata7523690n1 storage account. The solution must ensure that corpsoftware can store only up to 250 GB of data.
What should you do from the Azure portal?
Answer : See explanation below.
Explanation:
Step 1: Go to the Storage Account blade on the Azure portal:
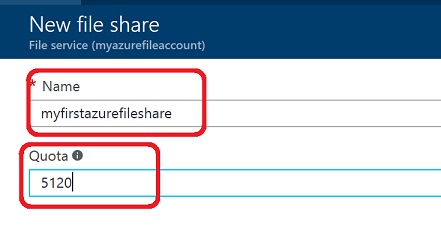
Step 2: Click on add File Share button:
Step 3: Provide Name (corpdata7523690n1) and Quota (250 GB).
References:
https://docs.microsoft.com/en-us/azure/storage/files/storage-how-to-create-file-share
Question 6
SIMULATION -
Click to expand each objective. To connect to the Azure portal, type https://portal.azure.com in the browser address bar.


When you are finished performing all the tasks, click the "˜Next"™ button.
Note that you cannot return to the lab once you click the "˜Next"™ button. Scoring occur in the background while you complete the rest of the exam.
Overview -
The following section of the exam is a lab. In this section, you will perform a set of tasks in a live environment. While most functionality will be available to you as it would be in a live environment, some functionality (e.g., copy and paste, ability to navigate to external websites) will not be possible by design.
Scoring is based on the outcome of performing the tasks stated in the lab. In other words, it doesn"™t matter how you accomplish the task, if you successfully perform it, you will earn credit for that task.
Labs are not timed separately, and this exam may have more than one lab that you must complete. You can use as much time as you would like to complete each lab. But, you should manage your time appropriately to ensure that you are able to complete the lab(s) and all other sections of the exam in the time provided.
Please note that once you submit your work by clicking the Next button within a lab, you will NOT be able to return to the lab.
To start the lab -
You may start the lab by clicking the Next button.
You plan to back up all the Azure virtual machines in your Azure subscription at 02:00 Coordinated Universal Time (UTC) daily.
You need to prepare the Azure environment to ensure that any new virtual machines can be configured quickly for backup. The solution must ensure that all the daily backups performed at 02:00 UTC are stored for only 90 days.
What should you do from your Recovery Services vault on the Azure portal?
Answer : See explanation below.
Explanation:
Task A: Create a Recovery Services vault (if a vault already exists skip this task, go to Task B below)
A1. From Azure Portal, On the Hub menu, click All services and in the list of resources, type Recovery Services and click Recovery Services vaults.
If there are recovery services vaults in the subscription, the vaults are listed.
A2. On the Recovery Services vaults menu, click Add.
A3. The Recovery Services vault blade opens, prompting you to provide a Name, Subscription, Resource group, and Location
Task B.
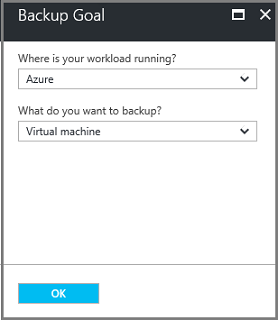
B1. On the Recovery Services vault blade (for the vault you just created), in the Getting Started section, click Backup, then on the Getting Started with Backup blade, select Backup goal.
The Backup Goal blade opens. If the Recovery Services vault has been previously configured, then the Backup Goal blades opens when you click Backup on the
Recovery Services vault blade.
B2. From the Where is your workload running? drop-down menu, select Azure.
B3. From the What do you want to backup? menu, select Virtual Machine, and click OK.
B4. Finish the Wizard.
Task C. create a backup schedule
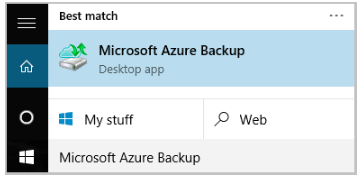
C1. Open the Microsoft Azure Backup agent. You can find it by searching your machine for Microsoft Azure Backup.
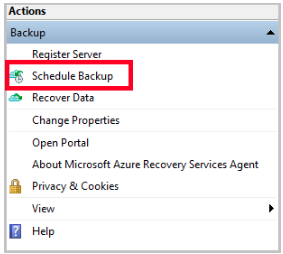
C2. In the Backup agent's Actions pane, click Schedule Backup to launch the Schedule Backup Wizard.
C3. On the Getting started page of the Schedule Backup Wizard, click Next.
C4. On the Select Items to Backup page, click Add Items.
The Select Items dialog opens.
C5. Select Blob Storage you want to protect, and then click OK.
C6.In the Select Items to Backup page, click Next.
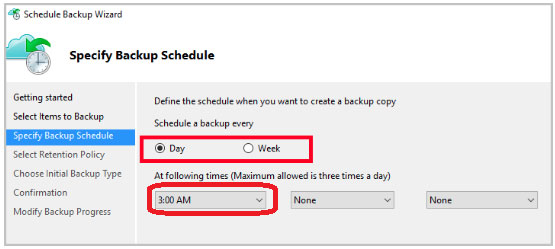
On the Specify Backup Schedule page, specify
Schedule a backup every: day -
At the following times: 2.00 AM -

C7. On the Select Retention Policy page, set it to 90 days, and click Next.
C8. Finish the Wizard.
References:
https://docs.microsoft.com/en-us/azure/backup/backup-configure-vault
Question 7
SIMULATION -
Click to expand each objective. To connect to the Azure portal, type https://portal.azure.com in the browser address bar.


When you are finished performing all the tasks, click the "˜Next"™ button.
Note that you cannot return to the lab once you click the "˜Next"™ button. Scoring occur in the background while you complete the rest of the exam.
Overview -
The following section of the exam is a lab. In this section, you will perform a set of tasks in a live environment. While most functionality will be available to you as it would be in a live environment, some functionality (e.g., copy and paste, ability to navigate to external websites) will not be possible by design.
Scoring is based on the outcome of performing the tasks stated in the lab. In other words, it doesn"™t matter how you accomplish the task, if you successfully perform it, you will earn credit for that task.
Labs are not timed separately, and this exam may have more than one lab that you must complete. You can use as much time as you would like to complete each lab. But, you should manage your time appropriately to ensure that you are able to complete the lab(s) and all other sections of the exam in the time provided.
Please note that once you submit your work by clicking the Next button within a lab, you will NOT be able to return to the lab.
To start the lab -
You may start the lab by clicking the Next button.
You plan to connect several virtual machines to the VNET01-USEA2 virtual network.
In the corpdatalod7523690 resource group, you need to create a virtual machine that uses the Standard_B2ms size named Web01 that runs Windows Server
2016. Web01 must be added to an availability set.
What should you do from the Azure portal?
Answer : See explanation below.
Explanation:
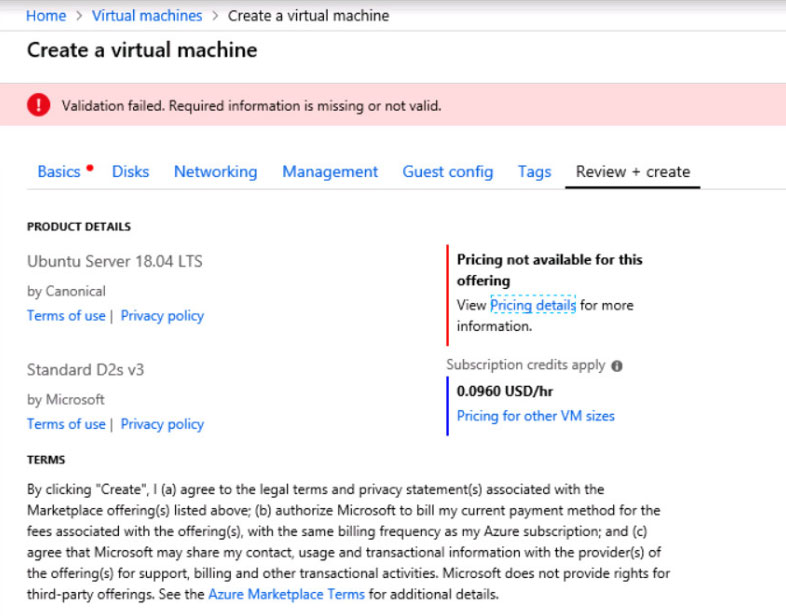
Step 1: Choose Create a resource in the upper left-hand corner of the Azure portal.
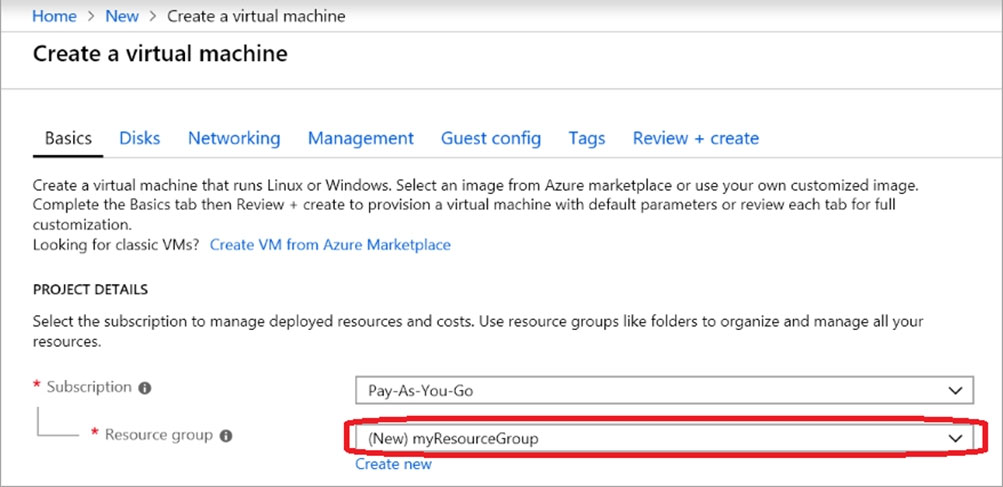
Step 2: In the Basics tab, under Project details, make sure the correct subscription is selected and then choose corpdatalod7523690 resource group
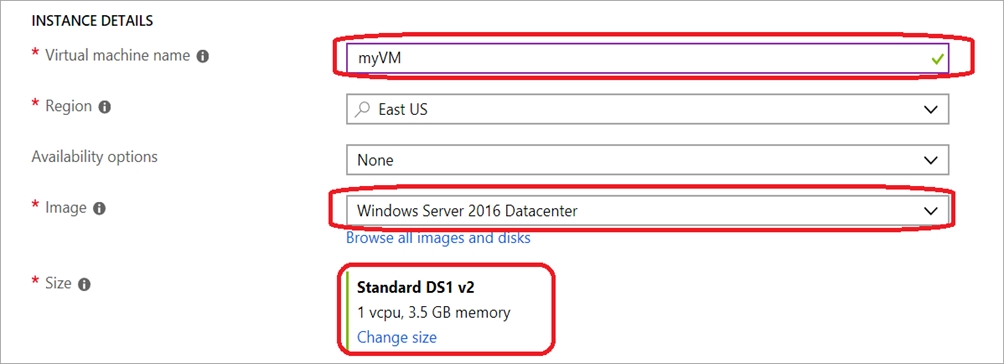
Step 3: Under Instance details type/select:
Virtual machine name: Web01 -
Image: Windows Server 2016
Size: Standard_B2ms size
Leave the other defaults.
Step 4: Finish the Wizard -
Question 8
SIMULATION -
Click to expand each objective. To connect to the Azure portal, type https://portal.azure.com in the browser address bar.


When you are finished performing all the tasks, click the "˜Next"™ button.
Note that you cannot return to the lab once you click the "˜Next"™ button. Scoring occur in the background while you complete the rest of the exam.
Overview -
The following section of the exam is a lab. In this section, you will perform a set of tasks in a live environment. While most functionality will be available to you as it would be in a live environment, some functionality (e.g., copy and paste, ability to navigate to external websites) will not be possible by design.
Scoring is based on the outcome of performing the tasks stated in the lab. In other words, it doesn"™t matter how you accomplish the task, if you successfully perform it, you will earn credit for that task.
Labs are not timed separately, and this exam may have more than one lab that you must complete. You can use as much time as you would like to complete each lab. But, you should manage your time appropriately to ensure that you are able to complete the lab(s) and all other sections of the exam in the time provided.
Please note that once you submit your work by clicking the Next button within a lab, you will NOT be able to return to the lab.
To start the lab -
You may start the lab by clicking the Next button.
You recently created a virtual machine named Web01.
You need to attach a new 80-GB standard data disk named Web01-Disk1 to Web01.
What should you do from the Azure portal?
Answer : See explanation below.
Explanation:
Add a data disk -
Step 1: In the Azure portal, from the menu on the left, select Virtual machines.
Step 2: Select the Web01 virtual machine from the list.
Step 3: On the Virtual machine page, , in Essentials, select Disks.

Step 4: On the Disks page, select the Web01-Disk1 from the list of existing disks.
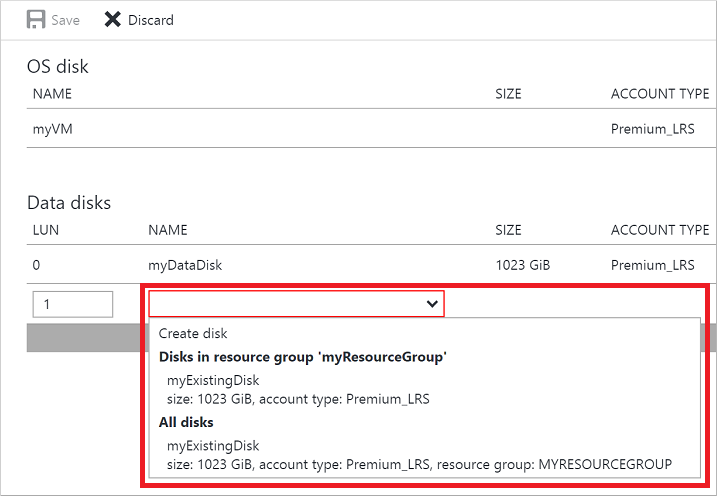
Step 5: In the Disks pane, click + Add data disk.
Step 6: Click the drop-down menu for Name to view a list of existing managed disks accessible to your Azure subscription. Select the managed disk Web01-Disk1 to attach:
References:
https://docs.microsoft.com/en-us/azure/virtual-machines/linux/attach-disk-portal
Question 9
SIMULATION -
Click to expand each objective. To connect to the Azure portal, type https://portal.azure.com in the browser address bar.


When you are finished performing all the tasks, click the "˜Next"™ button.
Note that you cannot return to the lab once you click the "˜Next"™ button. Scoring occur in the background while you complete the rest of the exam.
Overview -
The following section of the exam is a lab. In this section, you will perform a set of tasks in a live environment. While most functionality will be available to you as it would be in a live environment, some functionality (e.g., copy and paste, ability to navigate to external websites) will not be possible by design.
Scoring is based on the outcome of performing the tasks stated in the lab. In other words, it doesn"™t matter how you accomplish the task, if you successfully perform it, you will earn credit for that task.
Labs are not timed separately, and this exam may have more than one lab that you must complete. You can use as much time as you would like to complete each lab. But, you should manage your time appropriately to ensure that you are able to complete the lab(s) and all other sections of the exam in the time provided.
Please note that once you submit your work by clicking the Next button within a lab, you will NOT be able to return to the lab.
To start the lab -
You may start the lab by clicking the Next button.
You plan to allow connections between the VNET01-USEA2 and VNET01-USWE2 virtual networks.
You need to ensure that virtual machines can communicate across both virtual networks by using their private IP address.
The solution must NOT require any virtual network gateways.
What should you do from the Azure portal?
Answer : See explanation below.
Explanation:
Virtual network peering enables you to seamlessly connect two Azure virtual networks. Once peered, the virtual networks appear as one, for connectivity purposes.
Peer virtual networks -
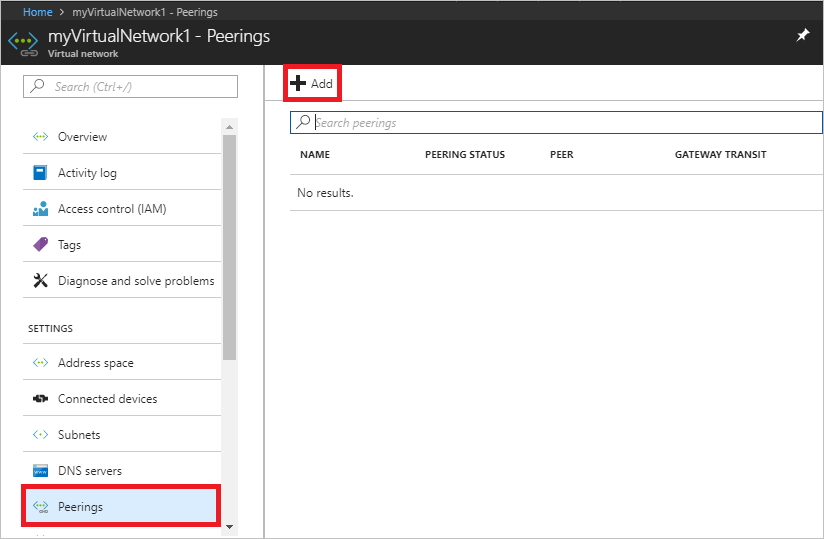
Step 1. In the Search box at the top of the Azure portal, begin typing VNET01-USEA2. When VNET01-USEA2 appears in the search results, select it.
Step 2. Select Peerings, under SETTINGS, and then select + Add, as shown in the following picture:
Step 3. Enter, or select, the following information, accept the defaults for the remaining settings, and then select OK.
Name: myVirtualNetwork1-myVirtualNetwork2 (for example)
Subscription: elect your subscription.
Virtual network: VNET01-USWE2 - To select the VNET01-USWE2 virtual network, select Virtual network, then select VNET01-USWE2. You can select a virtual network in the same region or in a different region.
Now we need to repeat steps 1-3 for the other network VNET01-USWE2:
Step 4. In the Search box at the top of the Azure portal, begin typing VNET01- USEA2. When VNET01- USEA2 appears in the search results, select it.
Step 5. Select Peerings, under SETTINGS, and then select + Add.
References:
https://docs.microsoft.com/en-us/azure/virtual-network/tutorial-connect-virtual-networks-portal
Question 10
SIMULATION -
Click to expand each objective. To connect to the Azure portal, type https://portal.azure.com in the browser address bar.


When you are finished performing all the tasks, click the "˜Next"™ button.
Note that you cannot return to the lab once you click the "˜Next"™ button. Scoring occur in the background while you complete the rest of the exam.
Overview -
The following section of the exam is a lab. In this section, you will perform a set of tasks in a live environment. While most functionality will be available to you as it would be in a live environment, some functionality (e.g., copy and paste, ability to navigate to external websites) will not be possible by design.
Scoring is based on the outcome of performing the tasks stated in the lab. In other words, it doesn"™t matter how you accomplish the task, if you successfully perform it, you will earn credit for that task.
Labs are not timed separately, and this exam may have more than one lab that you must complete. You can use as much time as you would like to complete each lab. But, you should manage your time appropriately to ensure that you are able to complete the lab(s) and all other sections of the exam in the time provided.
Please note that once you submit your work by clicking the Next button within a lab, you will NOT be able to return to the lab.
To start the lab -
You may start the lab by clicking the Next button.
You plan to host several secured websites on Web01.
You need to allow HTTPS over TCP port 443 to Web01 and to prevent HTTP over TCP port 80 to Web01.
What should you do from the Azure portal?
Answer : See explanation below.
Explanation:
You can filter network traffic to and from Azure resources in an Azure virtual network with a network security group. A network security group contains security rules that allow or deny inbound network traffic to, or outbound network traffic from, several types of Azure resources.
A network security group contains security rules that allow or deny inbound network traffic to, or outbound network traffic from, several types of Azure resources.
Step A: Create a network security group
A1. Search for and select the resource group for the VM, choose Add, then search for and select Network security group.
A2. Select Create.
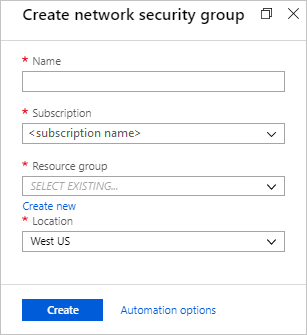
The Create network security group window opens.
A3. Create a network security group
Enter a name for your network security group.
Select or create a resource group, then select a location.
A4. Select Create to create the network security group.
Step B: Create an inbound security rule to allows HTTPS over TCP port 443
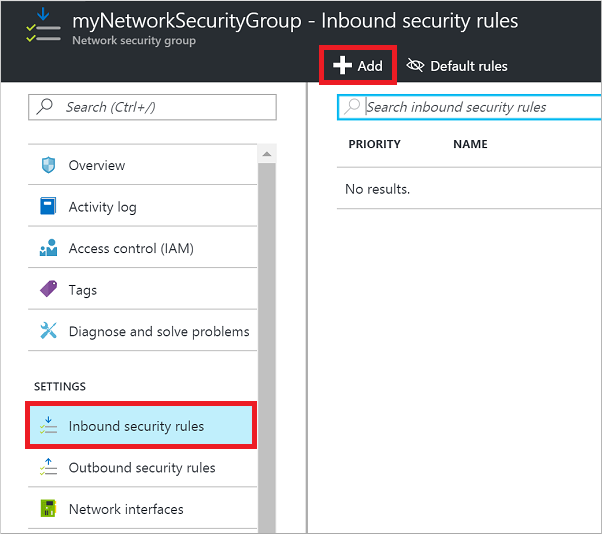
B1. Select your new network security group.
B2. Select Inbound security rules, then select Add.
B3. Add inbound rule -
B4. Select Advanced.
From the drop-down menu, select HTTPS.
You can also verify by clicking Custom and selecting TCP port, and 443.
B5. Select Add to create the rule.
Repeat step B2-B5 to deny TCP port 80
B6. Select Inbound security rules, then select Add.
B7. Add inbound rule -
B8. Select Advanced.
Clicking Custom and selecting TCP port, and 80.
B9. Select Deny.
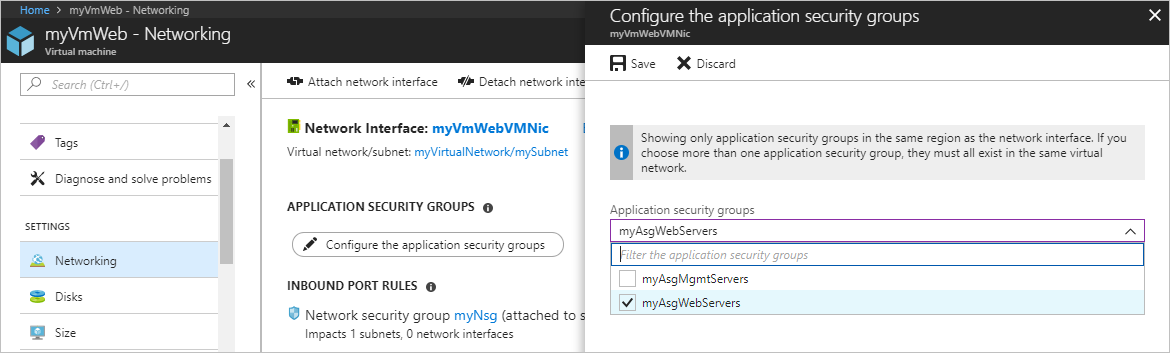
Step C: Associate your network security group with a subnet
Your final step is to associate your network security group with a subnet or a specific network interface.
C1. In the Search resources, services, and docs box at the top of the portal, begin typing Web01. When the Web01 VM appears in the search results, select it.
C2. Under SETTINGS, select Networking. Select Configure the application security groups, select the Security Group you created in Step A, and then select Save, as shown in the following picture:
References:
https://docs.microsoft.com/en-us/azure/virtual-network/tutorial-filter-network-traffic
Question 11
SIMULATION -
Click to expand each objective. To connect to the Azure portal, type https://portal.azure.com in the browser address bar.


When you are finished performing all the tasks, click the "˜Next"™ button.
Note that you cannot return to the lab once you click the "˜Next"™ button. Scoring occur in the background while you complete the rest of the exam.
Overview -
The following section of the exam is a lab. In this section, you will perform a set of tasks in a live environment. While most functionality will be available to you as it would be in a live environment, some functionality (e.g., copy and paste, ability to navigate to external websites) will not be possible by design.
Scoring is based on the outcome of performing the tasks stated in the lab. In other words, it doesn"™t matter how you accomplish the task, if you successfully perform it, you will earn credit for that task.
Labs are not timed separately, and this exam may have more than one lab that you must complete. You can use as much time as you would like to complete each lab. But, you should manage your time appropriately to ensure that you are able to complete the lab(s) and all other sections of the exam in the time provided.
Please note that once you submit your work by clicking the Next button within a lab, you will NOT be able to return to the lab.
To start the lab -
You may start the lab by clicking the Next button.
Your on-premises network uses an IP address range of 131.107.2.0 to 131.107.2.255.
You need to ensure that only devices from the on-premises network can connect to the rg1lod8322490n1 storage account.
What should you do from the Azure portal?
Answer : See solution below.
Explanation:
Step 1: Navigate to the rg1lod8322490n1 storage account.
Step 2: Click on the settings menu called Firewalls and virtual networks.
Step 3: Ensure that you have elected to allow access from 'Selected networks'.
Step 4: To grant access to an internet IP range, enter the address range of 131.107.2.0 to 131.107.2.255 (in CIDR format) under Firewall, Address Ranges.
References:
https://docs.microsoft.com/en-us/azure/storage/common/storage-network-security
Question 12
SIMULATION -
Click to expand each objective. To connect to the Azure portal, type https://portal.azure.com in the browser address bar.


When you are finished performing all the tasks, click the "˜Next"™ button.
Note that you cannot return to the lab once you click the "˜Next"™ button. Scoring occur in the background while you complete the rest of the exam.
Overview -
The following section of the exam is a lab. In this section, you will perform a set of tasks in a live environment. While most functionality will be available to you as it would be in a live environment, some functionality (e.g., copy and paste, ability to navigate to external websites) will not be possible by design.
Scoring is based on the outcome of performing the tasks stated in the lab. In other words, it doesn"™t matter how you accomplish the task, if you successfully perform it, you will earn credit for that task.
Labs are not timed separately, and this exam may have more than one lab that you must complete. You can use as much time as you would like to complete each lab. But, you should manage your time appropriately to ensure that you are able to complete the lab(s) and all other sections of the exam in the time provided.
Please note that once you submit your work by clicking the Next button within a lab, you will NOT be able to return to the lab.
To start the lab -
You may start the lab by clicking the Next button.
You plan to store media files in the corpdata7523690n1 storage account.
You need to configure the storage account to store the media files. The solution must ensure that only users who have access keys can download the media files and that the files are accessible only over HTTPS.
What should you do from the Azure portal?
Answer : See solution below.
Explanation:
We should create an Azure file share.
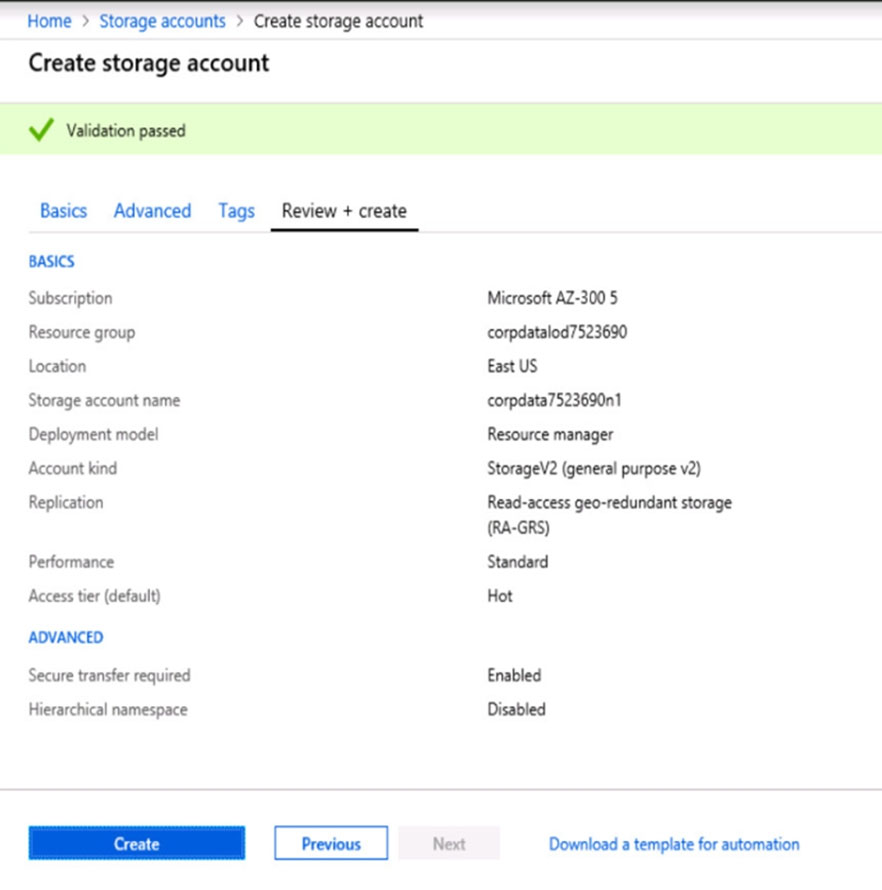
Step 1: In the Azure portal, select All services. In the list of resources, type Storage Accounts. As you begin typing, the list filters based on your input. Select
Storage Accounts.
On the Storage Accounts window that appears.
Step 2: Locate the corpdata7523690n1 storage account.
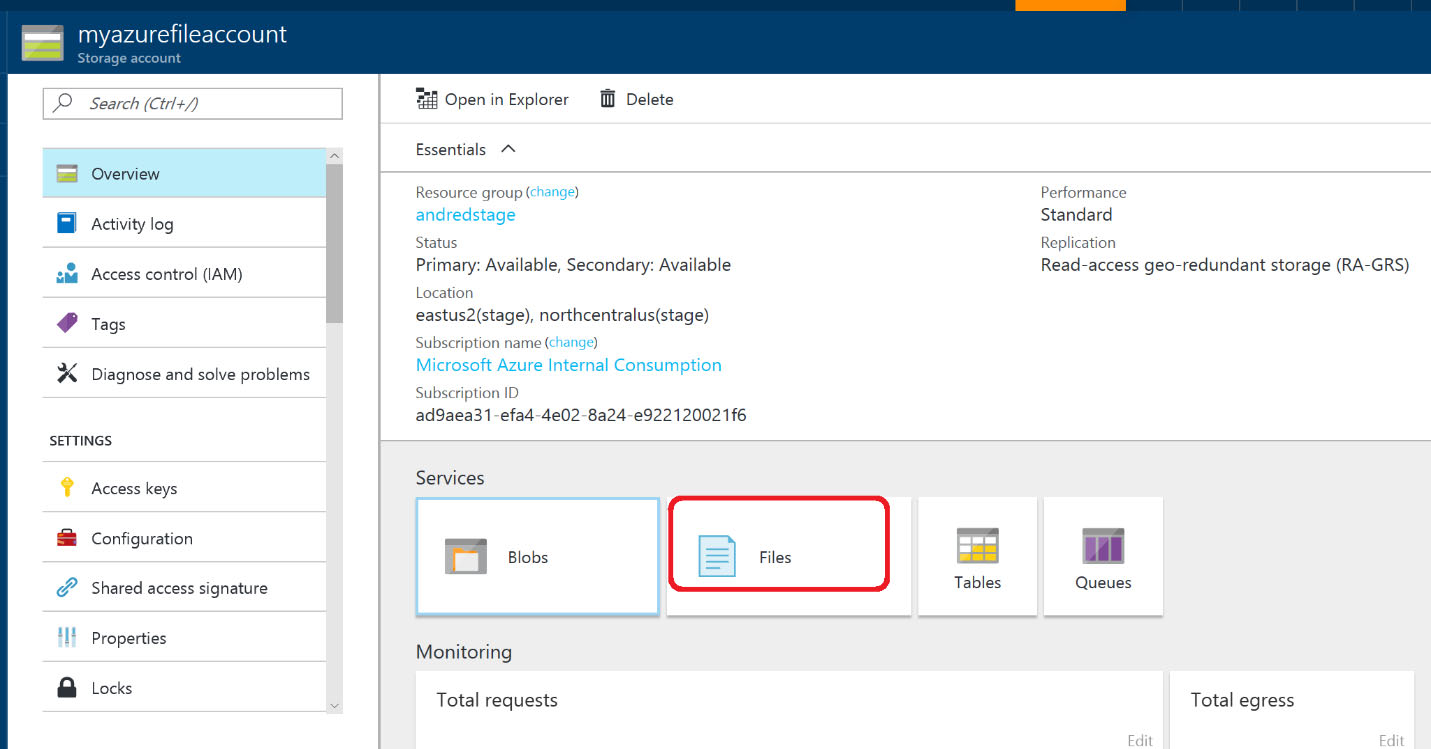
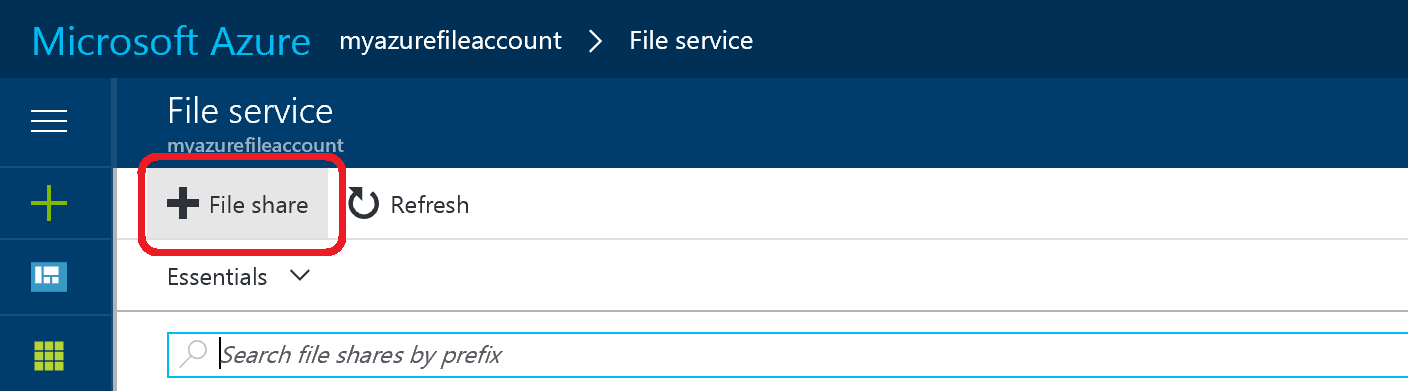
Step 3: On the storage account page, in the Services section, select Files.
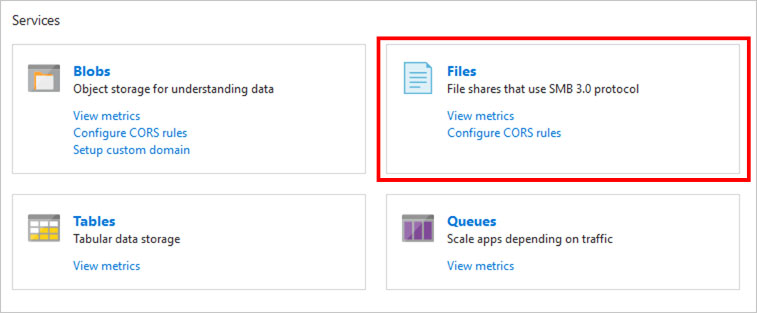
Step 4: On the menu at the top of the File service page, click + File share. The New file share page drops down.
Step 5: In Name type myshare. Click OK to create the Azure file share.
References:
https://docs.microsoft.com/en-us/azure/storage/files/storage-how-to-use-files-portal
Question 13
SIMULATION -
Click to expand each objective. To connect to the Azure portal, type https://portal.azure.com in the browser address bar.


When you are finished performing all the tasks, click the "˜Next"™ button.
Note that you cannot return to the lab once you click the "˜Next"™ button. Scoring occur in the background while you complete the rest of the exam.
Overview -
The following section of the exam is a lab. In this section, you will perform a set of tasks in a live environment. While most functionality will be available to you as it would be in a live environment, some functionality (e.g., copy and paste, ability to navigate to external websites) will not be possible by design.
Scoring is based on the outcome of performing the tasks stated in the lab. In other words, it doesn"™t matter how you accomplish the task, if you successfully perform it, you will earn credit for that task.
Labs are not timed separately, and this exam may have more than one lab that you must complete. You can use as much time as you would like to complete each lab. But, you should manage your time appropriately to ensure that you are able to complete the lab(s) and all other sections of the exam in the time provided.
Please note that once you submit your work by clicking the Next button within a lab, you will NOT be able to return to the lab.
To start the lab -
You may start the lab by clicking the Next button.
Another administrator attempts to establish connectivity between two virtual networks named VNET1 and VNET2. The administrator reports that connections across the virtual networks fail.
You need to ensure that network connections can be established successfully between VNET1 and VNET2 as quickly as possible.
What should you do from the Azure portal?
Answer : See solution below.
Explanation:
You can connect one VNet to another VNet using either a Virtual network peering, or an Azure VPN Gateway.
To create a virtual network gateway
Step 1: In the portal, on the left side, click +Create a resource and type 'virtual network gateway' in search. Locate Virtual network gateway in the search return and click the entry. On the Virtual network gateway page, click Create at the bottom of the page to open the Create virtual network gateway page.
Step 2: On the Create virtual network gateway page, fill in the values for your virtual network gateway.
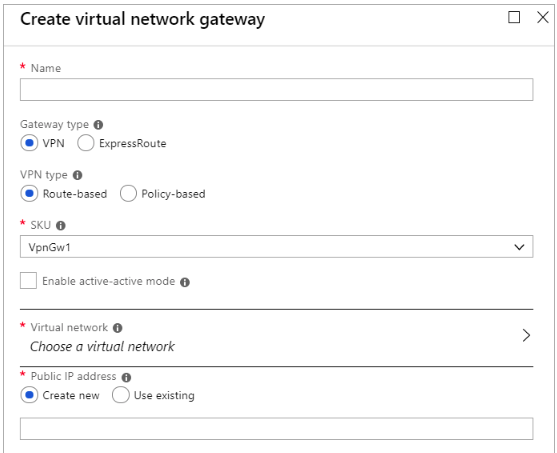
Name: Name your gateway. This is not the same as naming a gateway subnet. It's the name of the gateway object you are creating.
Gateway type: Select VPN. VPN gateways use the virtual network gateway type VPN.
Virtual network: Choose the virtual network to which you want to add this gateway. Click Virtual network to open the 'Choose a virtual network' page. Select the
VNet. If you don't see your VNet, make sure the Location field is pointing to the region in which your virtual network is located.
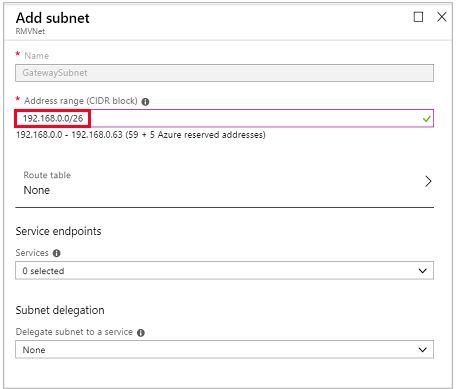
Gateway subnet address range: You will only see this setting if you did not previously create a gateway subnet for your virtual network. If you previously created a valid gateway subnet, this setting will not appear.
Step 4: Select Create New to create a Gateway subnet.
Step 5: Click Create to begin creating the VPN gateway. The settings are validated and you'll see the "Deploying Virtual network gateway" tile on the dashboard.
Creating a gateway can take up to 45 minutes. You may need to refresh your portal page to see the completed status.
References:
https://docs.microsoft.com/en-us/azure/vpn-gateway/vpn-gateway-howto-vnet-vnet-resource-manager-portal?
Question 14
SIMULATION -
Click to expand each objective. To connect to the Azure portal, type https://portal.azure.com in the browser address bar.


When you are finished performing all the tasks, click the "˜Next"™ button.
Note that you cannot return to the lab once you click the "˜Next"™ button. Scoring occur in the background while you complete the rest of the exam.
Overview -
The following section of the exam is a lab. In this section, you will perform a set of tasks in a live environment. While most functionality will be available to you as it would be in a live environment, some functionality (e.g., copy and paste, ability to navigate to external websites) will not be possible by design.
Scoring is based on the outcome of performing the tasks stated in the lab. In other words, it doesn"™t matter how you accomplish the task, if you successfully perform it, you will earn credit for that task.
Labs are not timed separately, and this exam may have more than one lab that you must complete. You can use as much time as you would like to complete each lab. But, you should manage your time appropriately to ensure that you are able to complete the lab(s) and all other sections of the exam in the time provided.
Please note that once you submit your work by clicking the Next button within a lab, you will NOT be able to return to the lab.
To start the lab -
You may start the lab by clicking the Next button.
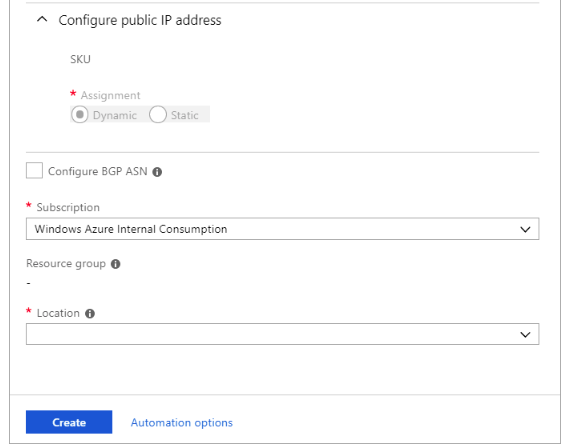
You plan to configure VM1 to be accessible from the internet.
You need to add a public IP address to the network interface used by VM1.
What should you do from the Azure portal?
Answer : See solution below.
Explanation:
You can add private and public IP addresses to an Azure network interface by completing the steps that follow.
Step 1: In Azure portal, click More services > type virtual machines in the filter box, and then click Virtual machines.
Step 2: In the Virtual machines pane, click the VM you want to add IP addresses to. Click Network interfaces in the virtual machine pane that appears, and then select the network interface you want to add the IP addresses to. In the example shown in the following picture, the NIC named myNIC from the VM named myVM is selected:
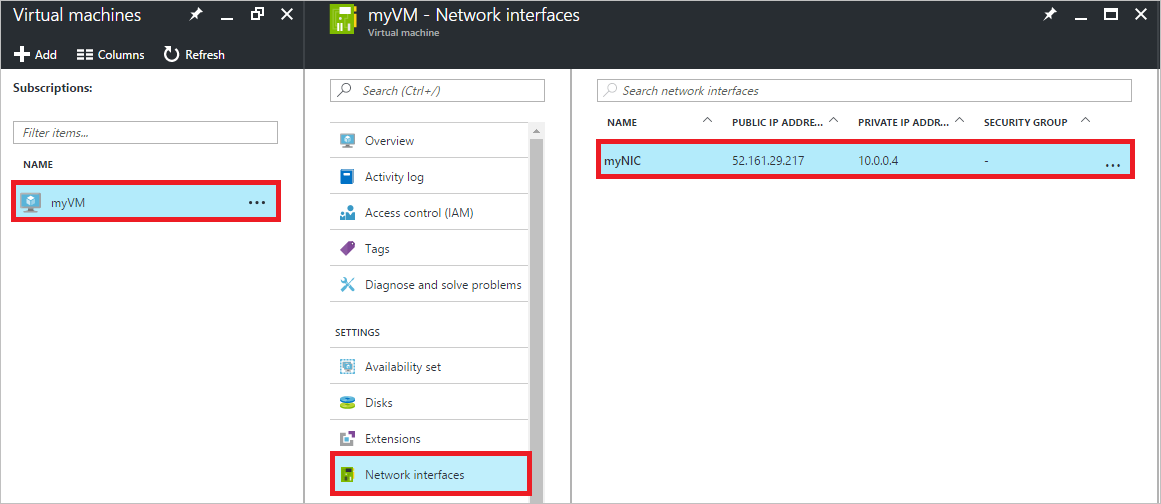
Step 3: In the pane that appears for the NIC you selected, click IP configurations.
Step 4: Click Create public IP address.
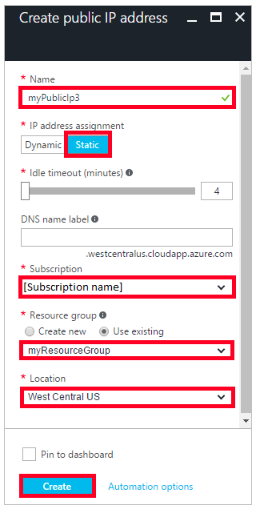
Step 5: In the Create public IP address pane that appears, enter a Name, select an IP address assignment type, a Subscription, a Resource group, and a
Location, then click Create, as shown in the following picture:
References:
https://docs.microsoft.com/en-us/azure/virtual-network/virtual-network-multiple-ip-addresses-portal
Question 15
SIMULATION -
Click to expand each objective. To connect to the Azure portal, type https://portal.azure.com in the browser address bar.


When you are finished performing all the tasks, click the "˜Next"™ button.
Note that you cannot return to the lab once you click the "˜Next"™ button. Scoring occur in the background while you complete the rest of the exam.
Overview -
The following section of the exam is a lab. In this section, you will perform a set of tasks in a live environment. While most functionality will be available to you as it would be in a live environment, some functionality (e.g., copy and paste, ability to navigate to external websites) will not be possible by design.
Scoring is based on the outcome of performing the tasks stated in the lab. In other words, it doesn"™t matter how you accomplish the task, if you successfully perform it, you will earn credit for that task.
Labs are not timed separately, and this exam may have more than one lab that you must complete. You can use as much time as you would like to complete each lab. But, you should manage your time appropriately to ensure that you are able to complete the lab(s) and all other sections of the exam in the time provided.
Please note that once you submit your work by clicking the Next button within a lab, you will NOT be able to return to the lab.
To start the lab -
You may start the lab by clicking the Next button.
You need to allow RDP connections over TCP port 3389 to VM1 from the Internet. The solutions must prevent connections from the Internet over all other TCP ports.
What should you do from the Azure portal?
Answer : See solution below.
Explanation:
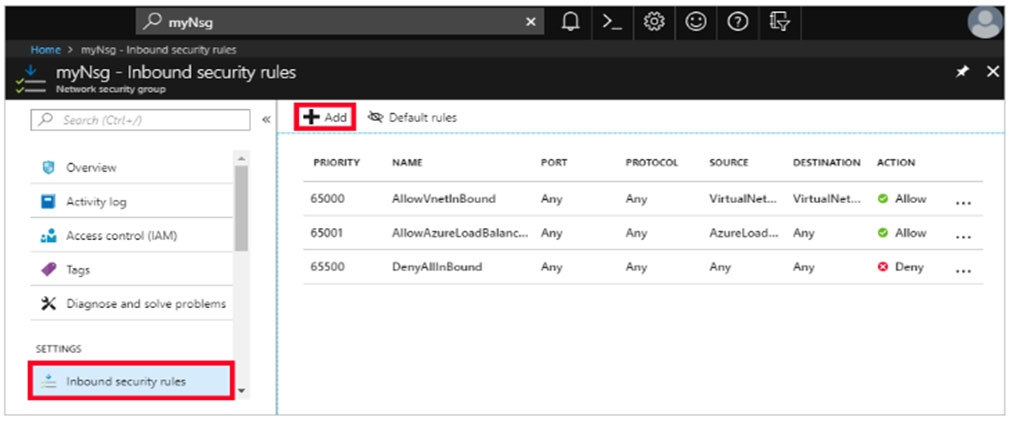
Step 1: Create a new network security group
Step 2: Select your new network security group.
Step 3: Select Inbound security rules. Under Add inbound security rule, enter the following
Destination: Select Network security group, and then select the security group you created previously.
Destination port ranges: 3389 -
Protocol: Select TCP -
References:
https://docs.microsoft.com/en-us/azure/virtual-network/tutorial-filter-network-traffic