Red Hat Certified System Administrator (RHCSA) v1.0
Question 1
SIMULATION -
Install the Kernel Upgrade.
Install suitable kernel update from:
http://server.domain11.example.com/pub/updates.
Following requirements must be met:
Updated kernel used as the default kernel of system start-up.
The original kernel is still valid and can be guided when system starts up.
Answer : See explanation below.
Explanation: Using the browser open the URL in the question, download kernel file to root or home directory. uname ג€"r// check the current kernel version rpm ג€"ivh kernel-*.rpm vi /boot/grub.conf// check
Some questions are: Install and upgrade the kernel as required. To ensure that grub2 is the default item for startup.
Yum repo : http://content.example.com/rhel7.0/x86-64/errata
OR -
uname -r // check kernel
Yum-config-manager --add-repo=ג€http://content.example.com/rhel7.0/x86-64/ errataג€
Yum clean all -
Yum list kernel// install directly
Yum -y install kernel// stuck with it, do not pipe! Please do not pipe!
Default enable new kernel grub2-editenv list// check
Modify grub2-set-default ג€kernel full nameג€
Grub2-mkconfig ג€"o/boot/grub2/grub.cfg// Refresh
Question 2
SIMULATION -
Binding to an external validation server.
System server.domain11.example.com provides a LDAP validation service, your system should bind to this service as required:
Base DN of validation service is dc=example,dc=com
LDAP is used for providing account information and validation information Connecting and using the certification of http://server.domain11.example.com/pub/
EXAMPLE-CA-CERT to encrypt -
After the correct configuration, ldapuser1 can log into your system, it does not have HOME directory until you finish autofs questions, ldapuser1 password is password.
Answer : See explanation below.
Explanation: yum -y install sssd authconfig-gtk krb5-workstation authconfig-gtk // open the graphical interface
Modify user account database to ldap, fill up DN and LDAP SERVER as questions required, use TLS to encrypt connections making tick, write http:// server.domain11.example.com/pub/EXAMPLE-CA-CERT to download ca, authentication method choose ldap password.
You can test if the ldapuser is added by the following command:
Id ldapuser1 -
Note: user password doesnג€™t not need to set
Question 3
SIMULATION -
Configure NTP.
Configure NTP service, Synchronize the server time, NTP server: classroom.example.com
Answer : See explanation below.
Explanation: Configure the client:
Yum -y install chrony -
Vim /etc/chrony.conf -
Add: server classroom.example.com iburst
Start: systemctl enable chronyd -
systemctl restart chronyd
Validate: timedatectl status -
Question 4
SIMULATION -
Configure autofs.
Configure the autofs automatically mount to the home directory of LDAP, as required: server.domain11.example.com use NFS to share the home to your system. This file system contains a pre configured home directory of user ldapuserX.
Home directory of ldapuserX is:
server.domain11.example.com /home/guests/ldapuser
Home directory of ldapuserX should automatically mount to the ldapuserX of the local /home/guests Home directoryג€™s write permissions must be available for users ldapuser1ג€™s password is password
Answer : See explanation below.
Explanation: yum install -y autofs
mkdir /home/rehome
/etc/auto.master
/home/rehome/etc/auto.ldap
Keep then exit -
cp /etc/auto.misc /etc/auto.ldap
/etc/auto.ldap
ldapuserX -fstype=nfs,rw server.domain11.example.com:/home/guests/
Keep then exit -
systemctl start autofs
systemctl enable autofs
su - ldapuserX// test
If the above solutions cannot create files or the command prompt is -bash-4.2$, it maybe exist multi-level directory, this needs to change the server.domain11.example.com:/home/guests/ to server.domain11.example.com:/home/guests/ldapuserX. What is multi-level directory? It means there is a directory of ldapuserX under the /home/guests/ldapuserX in the questions. This directory is the real directory.
Question 5
SIMULATION -
Configure a user account.
Create a user iar uid is 3400. Password is redhat
ן¼
Answer : See explanation below.
Explanation: useradd -u 3400 iar
passwd iar
Question 6
SIMULATION -
Add a swap partition.
Adding an extra 500M swap partition to your system, this swap partition should mount automatically when the system starts up. Don't remove and modify the existing swap partitions on your system.
Answer : See explanation below.
Explanation:
fdisk -cu /dev/vda// in the way of expanding the partition, donג€™t make main partition partx ג€"a /dev/vda mkswap /dev/vdax swapon /dev/vdax swapon ג€"s vi /etc/fstab
/dev/vdaxswapswapdefaults0 0
mount -a
Question 7
SIMULATION -
Search files.
Find out files owned by jack, and copy them to directory /root/findresults
Answer : See explanation below.
Explanation: mkdir/root/findfiles
find / -user jack -exec cp -a {} /root/findfiles/ \; ls /root/findresults
Question 8
SIMULATION -
Search a String -
Find out all the columns that contains the string seismic within /usr/share/dict/words, then copy all these columns to /root/lines.tx in original order, there is no blank line, all columns must be the accurate copy of the original columns.
Answer : See explanation below.
Explanation: grep seismic /usr/share/dict/words > /root/lines.txt
Question 9
SIMULATION -
Create a backup -
Create a backup file named /root/backup.tar.bz2, contains the content of /usr/local, tar must use bzip2 to compress.
Answer : See explanation below.
Explanation:
cd /usr/local
tar ג€"jcvf /root/backup.tar.bz2
mkdir /test
tar ג€"jxvf /root/backup.tar.bz2 ג€"C /test// Decompression to check the content is the same as the /usr/loca after
If the questions require to use gzip to compress. change ג€"j to ג€"z.
Question 10
SIMULATION -
Create a logical volume -
Create a new logical volume as required:
Name the logical volume as database, belongs to datastore of the volume group, size is 50 PE.
Expansion size of each volume in volume group datastore is 16MB.
Use ext3 to format this new logical volume, this logical volume should automatically mount to /mnt/database
Answer : See explanation below.
Explanation: fdisk -cu /dev/vda// Create a 1G partition, modified when needed partx ג€"a /dev/vda pvcreate /dev/vdax vgcreate datastore /dev/vdax ג€"s 16M lvcreateג€" l 50 ג€"n database datastore mkfs.ext3 /dev/datastore/database mkdir /mnt/database mount /dev/datastore/database /mnt/database/ df ג€"Th vi /etc/fstab
/dev/datastore /database /mnt/database/ ext3 defaults 0 0 mount ג€"a
Restart and check all the questions requirements.
Question 11
SIMULATION -
Configure your Host Name, IP Address, Gateway and DNS.
Host name: dtop5.dn.ws.com -
IP Address: 172.28.10.5/4 -
Gateway: 172.28.10.1 -
DNS: 172.28.10.1 -
Answer : See explanation below.
Explanation:
1. Configure Host Name
vim /etc/sysconfig/network NETWORKING=yes HOSTNAME=dtop5.dn.ws.com GATEWAY=172.28.10.1
2. Configure IP Address, Gateway and DNS
Configure the network by Network Manager:
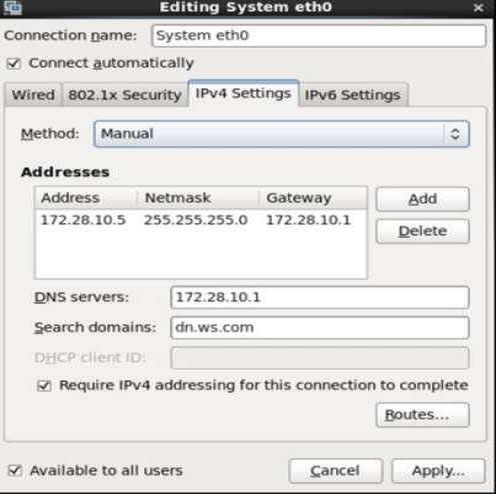
Note: Please remember to choose two options:
Connect automatically -
Available to all users -
Click "Apply", save and exit, and restart your network services:
# Service network restart
3. Validate these profiles:
a) Check gateway: # vim / etc / sysconfig / network
NETWORKING=yes -
HOSTNAME=dtop5.dn.ws.com -
GATEWAY=172.28.10.1 -
b) Check Host Name: # vim /etc/hosts

# Generated by NetworkManager
Search dn.ws.com -
Nameserver 172.28.10.1 -
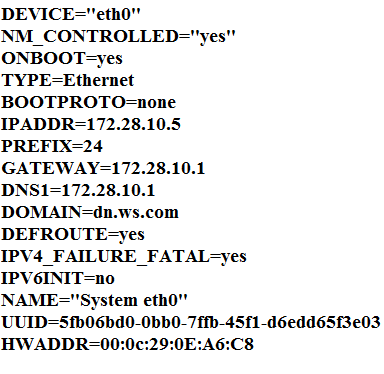
d) Check Gateway: # vim /etc/sysconfig/network-scripts/ifcfg-eth0
Question 12
SIMULATION -
Create a 2G swap partition which take effect automatically at boot-start, and it should not affect the original swap partition.
Answer : See explanation below.
Explanation: # fdisk /dev/sda -
p
(check Partition table)
n
(create new partition: press e to create extended partition, press p to create the main partition, and the extended partition is further divided into logical partitions)
Enter -
+2G t
8 I
82
W -
partx -a /dev/sda
partprobe
mkswap /dev/sda8
Copy UUID -
swapon -a
vim /etc/fstab
UUID=XXXXX swap swap defaults 0 0
(swapon -s)
Question 13
SIMULATION -
Please open the ip_forward, and take effect permanently.
Answer : See explanation below.
Explanation:
vim /etc/sysctl.conf net.ipv4.ip_forward = 1
sysctl ג€"w (takes effect immediately)
If no ג€sysctl.confג€ option, use these commands:
sysctl ג€"a |grep net.ipv4
sysctl ג€"P net.ipv4.ip_forward = 1
sysctl -w
Question 14
SIMULATION -
Open kmcrl value of 5 , and can verify in /proc/ cmdline
Answer : See explanation below.
Explanation:
# vim /boot/grub/grub.conf
kernel/vmlinuz-2.6.32-71.el6.x86_64 ro root=/dev/mapper/GLSvg-GLSrootrd_LVM_LV=GLSvg/GLSroot rd_LVM_LV=GLSvg/GLSswaprd_NO_LUKSrd_NO_MDrd_NO_DM
LANG=en_US.UTF-8 SYSFONT=latarcyrheb-sun16 KEYBOARDTYPE=pc KEYTABLE=us crashkernel=auto rhgb quiet kmcrl=5
Restart to take effect and verification:
# cat /proc/cmdline
ro root=/dev/mapper/GLSvg-GLSroot rd_LVM_LV=GLSvg/GLSroot rd_LVM_LV=GLSvg/GLSswap rd_NO_LUKS rd_NO_MD rd_NO_DM
LANG=en_US.UTF-8 SYSFONT=latarcyrheb-sun16 KEYBOARDTYPE=pc KEYTABLE=us rhgb quiet kmcrl=5
Question 15
SIMULATION -
Upgrade the kernel, start the new kernel by default. kernel download from this address: ftp://server1.domain10.example.com/pub/update/new.kernel
Answer : See explanation below.
Explanation: Download the new kernel file and then install it.
[root@desktop8 Desktop]# ls
kernel-2.6.32-71.7.1.el6.x86_64.rpm
kernel-firmware-2.6.32-71.7.1.el6.noarch.rpm
[root@desktop8 Desktop]# rpm -ivh kernel-*
Preparing... ###########################################
[100%]
1:kernel-firmware
########################################### [ 50%]
2:kernel
########################################### [100%]
Verify the grub.conf file, whether use the new kernel as the default boot. [root@desktop8 Desktop]# cat /boot/grub/grub.conf default=0 title Red Hat Enterprise Linux Server (2.6.32-71.7.1.el6.x86_64) root (hd0,0) kernel /vmlinuz-2.6.32-71.7.1.el6.x86_64 ro root=/dev/mapper/vol0-root rd_LVM_LV=vol0/root rd_NO_LUKS rd_NO_MD rd_NO_DM LANG=en_US.UTF-8 SYSFONT=latarcyrheb-sun16 KEYBOARDTYPE=pc KEYTABLE=us crashkernel=auto rhgb quiet initrd /initramfs-2.6.32-71.7.1.el6.x86_64.img